
miaPOS app — seller's guide
How to work with the miaPOS app on the terminal every day: opening the day, taking payment by QR code or payment link, refunds, reports and closing the day.
Overview
miaPOS is the payment acceptance app on the POS terminal you received from your bank. Through it you accept instant payments via the MIA system: the customer scans a QR code with their bank’s app (or receives a payment link or a payment request directly in the app), and the money reaches the merchant’s account within seconds.
The app comes pre-installed on the terminal — no additional installation is needed. On first launch, the terminal only needs to be activated (see Chapter 1).
This guide is intended for sellers — the people who work at the terminal every day. If you are using the terminal for the first time, start with Chapter 1. If the terminal is already set up, you can go straight to the chapter you need — each chapter is self-contained.
In short: three things a day
| When | What you do |
|---|---|
| Morning | Open the working day (the shift). |
| All day | Type in the amount → Generate QR → the customer scans → you see Payment received. |
| Evening | Profile → Close shift (Z) and check the totals. |
The rest of the guide explains what to do when something falls outside this routine.
Who does what
| Role | Responsibility |
|---|---|
| Acquiring bank | Creates the merchant and the terminal, issues the Terminal ID and the seller accounts, activates/deactivates the terminal, configures the tips IBAN. |
| Merchant (administrator) | Receives the enrollment data by email, hands out the accounts to the sellers, sets the terminal operating mode. |
| Seller (operator) | Signs in on the terminal, opens the day, takes payments, makes refunds, closes the day with the Z report. |
| miaPOS (Finergy) | The platform, technical support for the app, updates. |
A terminal is not created from the app — a new terminal appears only through the bank. Hence the general rule: issues with money, passwords and activation are resolved with the bank, while strange app behaviour goes to miaPOS support (see Chapter 10).
How the app is organized
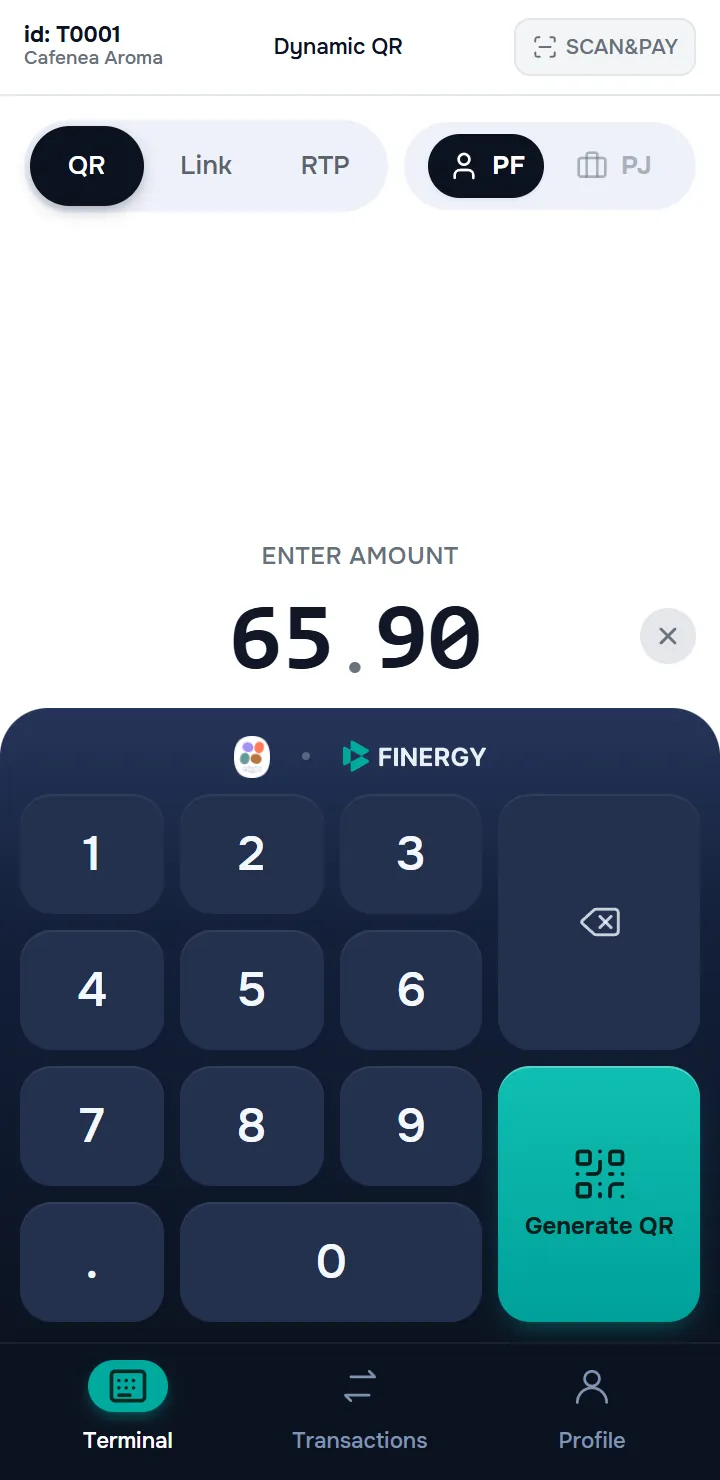
The app has three main sections, available from the navigation bar at the bottom of the screen:
- Terminal — the main payment screen: enter the amount and generate the QR code, or send a payment link / payment request.
- Transactions — the history of payments and refunds for the current day, plus the Requests tab with the payment links and requests you have sent.
- Profile — the working day status, the QR code settings, the app language, the support contacts and logout.
Basic concepts
| Term | What it means |
|---|---|
| Working day (shift) | The period during which the terminal can take payments. It is opened at the start of the day and closed with a Z report. |
| Payment channel | How the payment reaches the customer: QR (scanning), Link (payment link) or RTP (payment request sent to a phone number or IBAN). |
| QR code type | Dynamic, Static or Hybrid — selected in QR settings; it changes how the terminal works (see Chapters 3 and 9). |
| Payer type (PF / PJ) | The customer pays as an individual or as a company — see Chapter 6. |
| Tip | An optional amount the customer can add to the payment, if the option is enabled for the terminal. |
| Z report / X report | The day-closing report (final) / the intermediate report for the current day. |
App language
The app is available in Romanian, Russian and English. The language is changed from Profile → Language and applies immediately (see Chapter 9). This guide uses the names from the English interface.
1. Setting up and activating the app
At first launch, the terminal must be linked to your company and activated. You need two pieces of information: the company IDNO (from the registration certificate) and, if the company has more than one terminal, the Terminal ID — the unique device code received by email at enrollment.
1.1 Activating the terminal
On the start screen, under the prompt Enter data about your terminal:
- Fill in the IDNO company field (digits only) and tap Next.
- If the company has a single terminal, it is identified automatically — go straight to the next step.
- If the company has several terminals, an additional Terminal ID field (e.g. T0001) appears on the screen. Enter the code of the terminal you are working at and tap Next again.
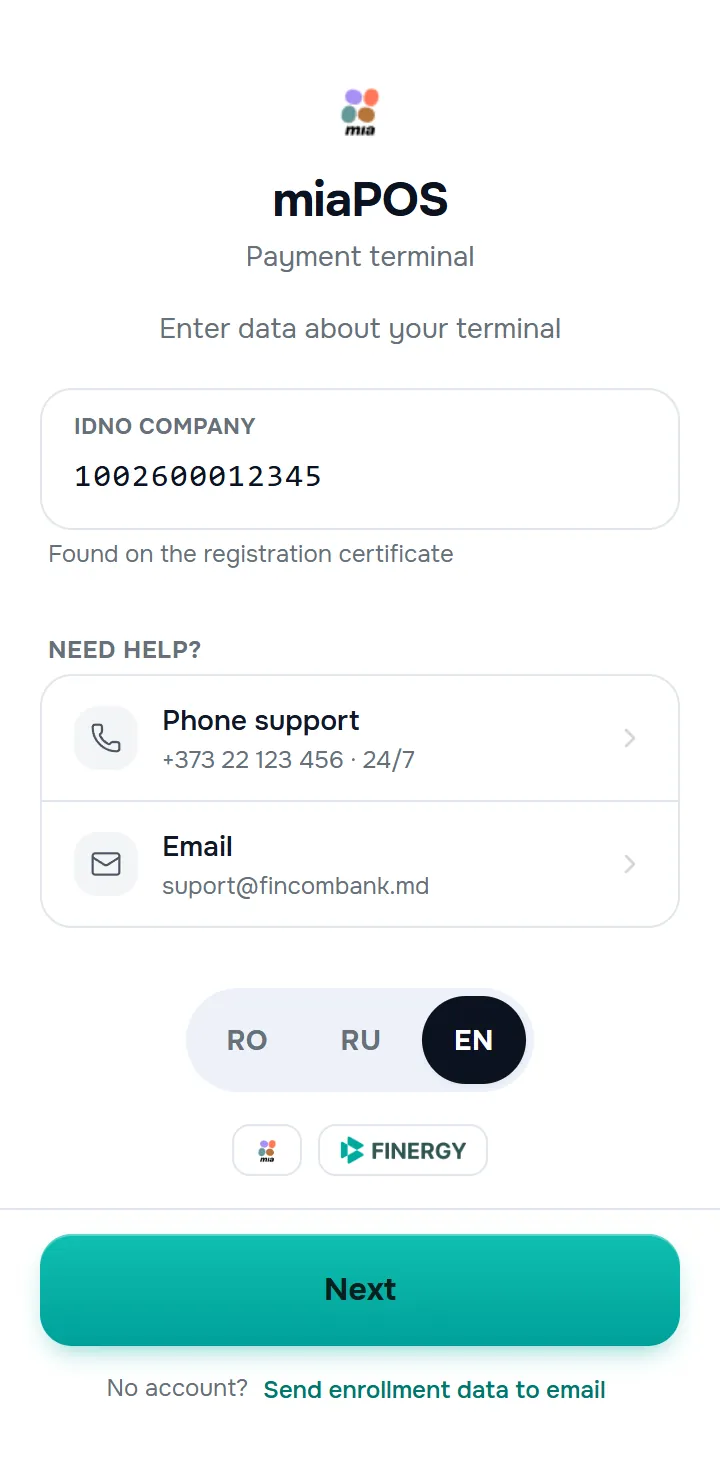
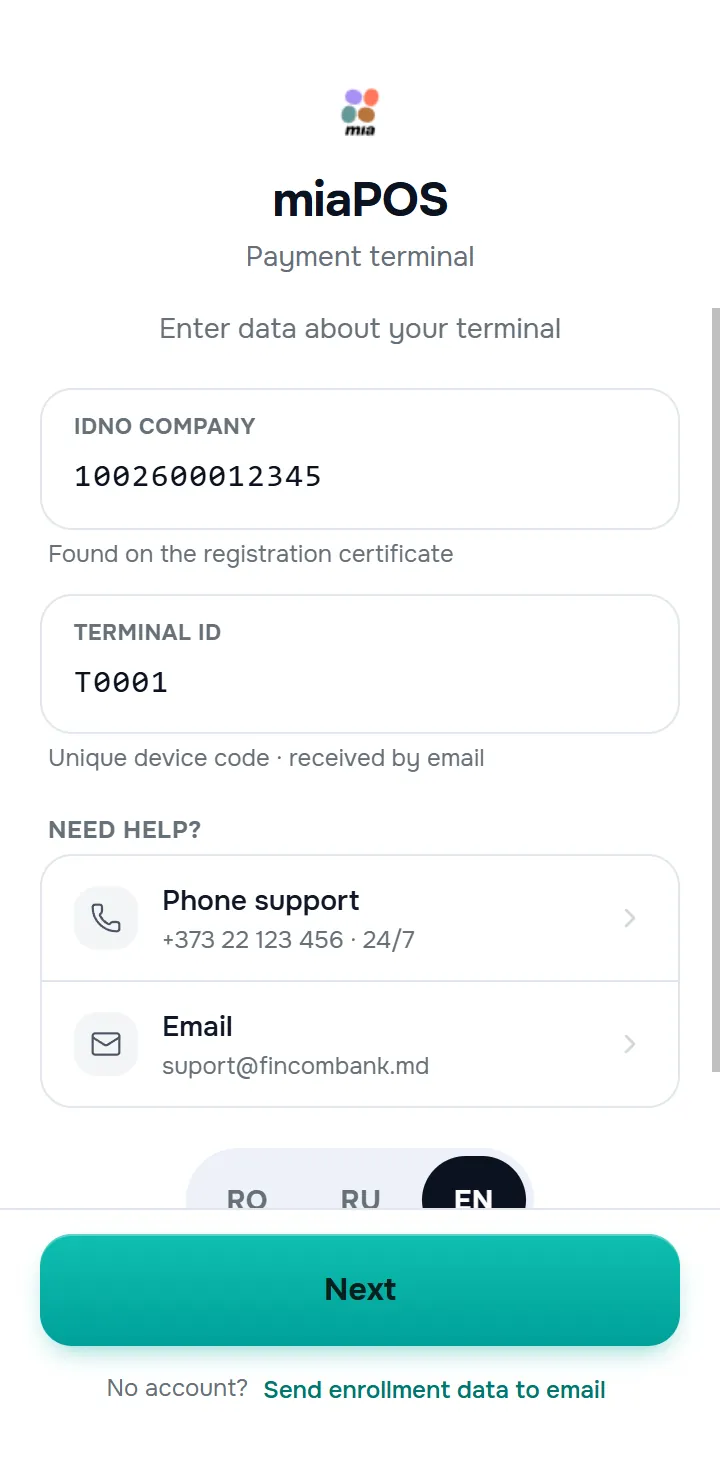
Empty fields are marked with This field is required. If activation cannot continue, the app shows one of the following messages:
| Situation | Message shown |
|---|---|
| The entered data does not match | Invalid credentials for terminal binding were specified. Please make sure you have entered the correct Terminal ID and IDNO and try again. |
| The terminal is not found in the system | The specified terminal was not found in the system. Check that the information you entered is correct or contact your administrator for support. |
| The terminal type is not compatible | The selected terminal type is not supported in the MiaPOS app |
| The terminal is inactive | Your terminal is currently inactive. Please contact support to activate your terminal and try again. |
In all these cases you can correct the data and retry the activation. On the same screen you will also find the Need help? block with the support phone number and email (one tap starts the call or opens the email app) and the language switcher.
1.2 Entering the OTP code
For standard activation, the system sends a one-time password (OTP) by SMS to the phone number of the merchant’s administrator. The OTP confirmation screen opens.
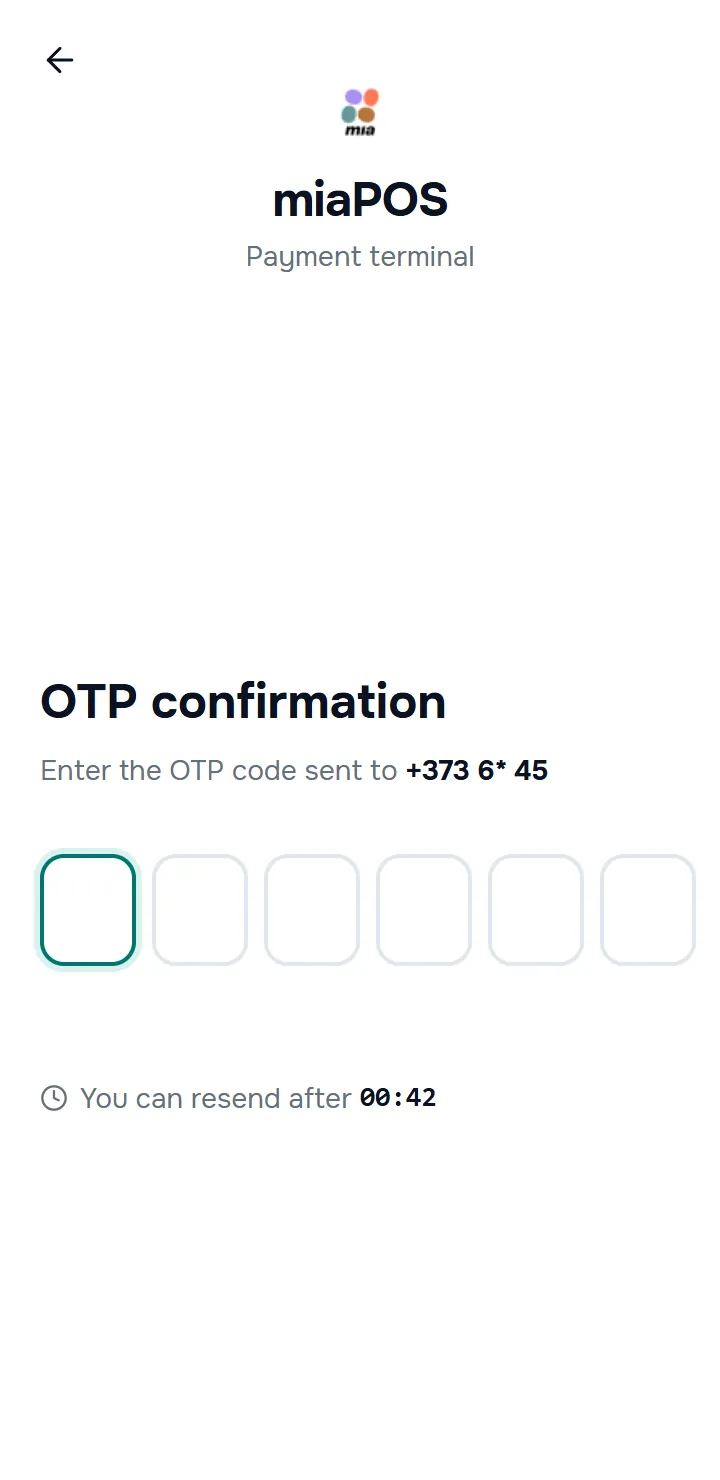
- Enter the 6 digits — the code is verified automatically on the last digit.
- If you did not receive the code, tap Send again (the button becomes available once the “You can resend after…” timer runs out).
- If the code is wrong, the app shows Entered wrong OTP. and the number of Attempts left.
- For security, the number of sendings and attempts is limited — if the limit is exceeded, retry the activation later.
- The arrow in the top left returns to the screen with the terminal data.
1.3 Simplified activation
Some terminals can be activated without an OTP code — if the bank has allowed this activation mode for that terminal. In this case, after you enter the data, the system checks the activation type automatically and continues on its own: no code is requested, and the activation confirmation appears directly on the screen. If the terminal requires standard activation, the app asks for the OTP code as usual.
1.4 Completing the activation
Once the activation is confirmed, the POS successfully activated screen appears, with the name of the point of sale, the IDNO and the company logo — the point of sale is ready to accept payments.
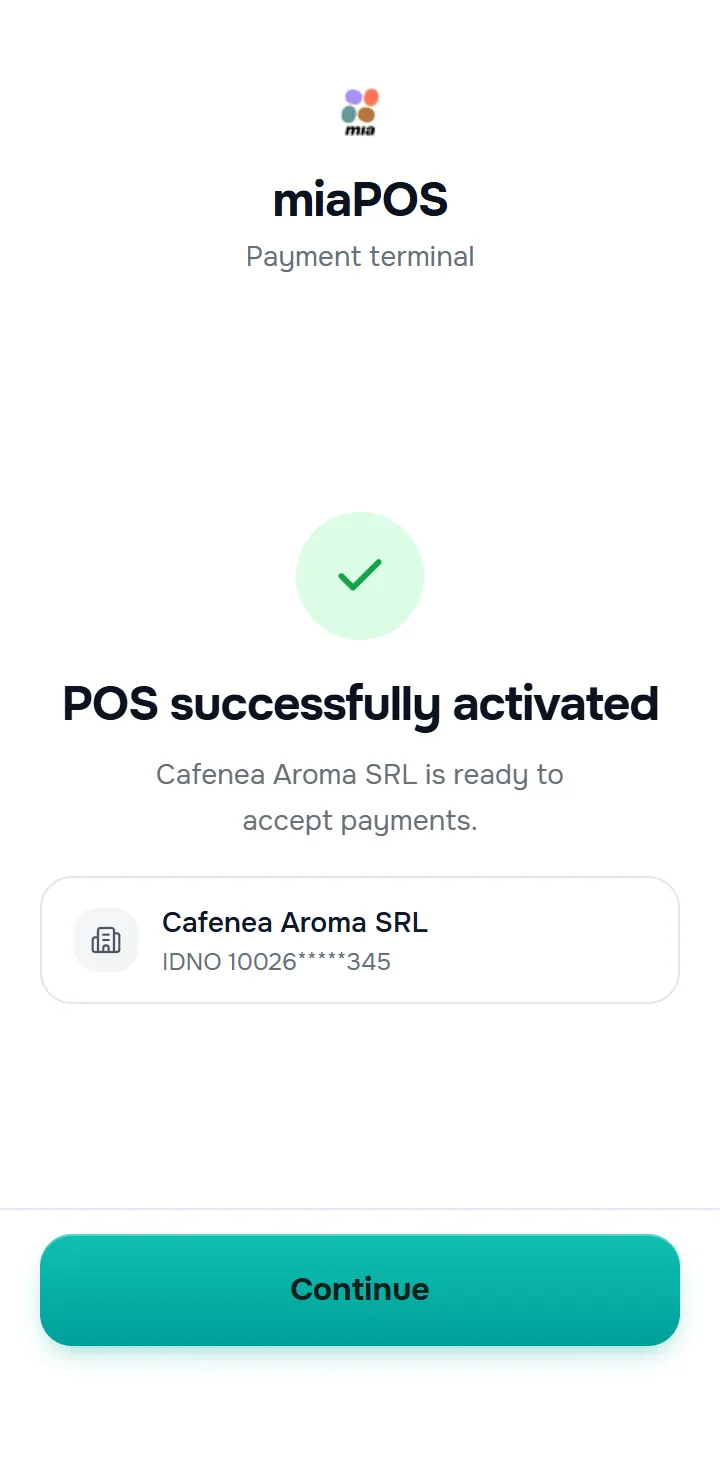
Tap Continue to move on to signing in. The app remembers the bank and the terminal — activation is not requested again on later launches.
1.5 Signing in to your account
On the sign-in screen, above the form, you can see the name of the point of sale and the terminal number. Enter the Username and Password — the seller credentials set up by the merchant’s administrator — and tap Sign in.
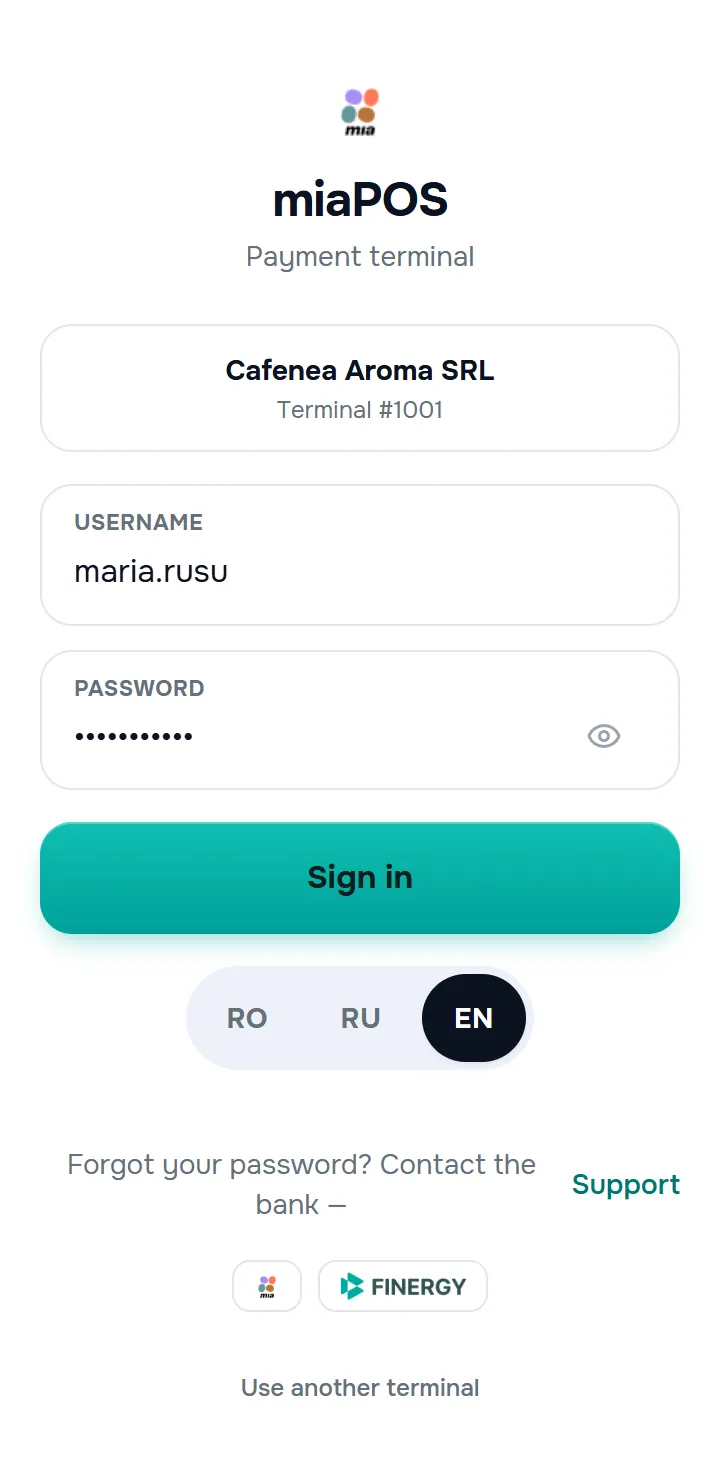
- Forgot your password? Contact the bank — the Support link below the form starts the call.
- Use another terminal clears the current binding and returns to activation — use it only if the terminal must be moved to another company or another point of sale.
1.6 Login attempt limits
When you sign in, the app tracks failed attempts:
- On a wrong password, it shows the message and the number of attempts left: Incorrect username or password. Attempts left: N. — this helps you avoid locking the account by accident.
- Once the limit is exceeded, signing in is blocked temporarily: Maximum number of login attempts exceeded. Please try again after the time indicated. During the block, wait — then try signing in again.
1.7 Automatic login
Some terminals work in “always ready” mode: at startup, the app signs in by itself (Logging in automatically… appears briefly on the screen), without a username or password. On these terminals there is no logout button, and the working day opens automatically. If the automatic login fails, the app shows the regular sign-in form.
1.8 No account?
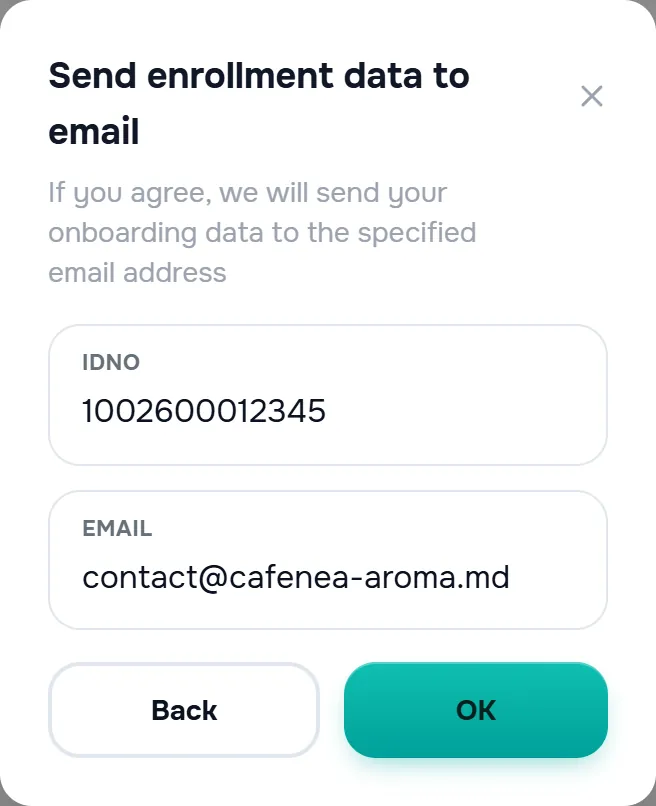
If your company is not yet enrolled in miaPOS, tap the Send enrollment data to email link on the activation screen. Fill in the company IDNO (13 digits) and the email address, then tap OK — the enrollment data will be sent to the address provided, and the bank will contact you.
2. Main screens and opening the day
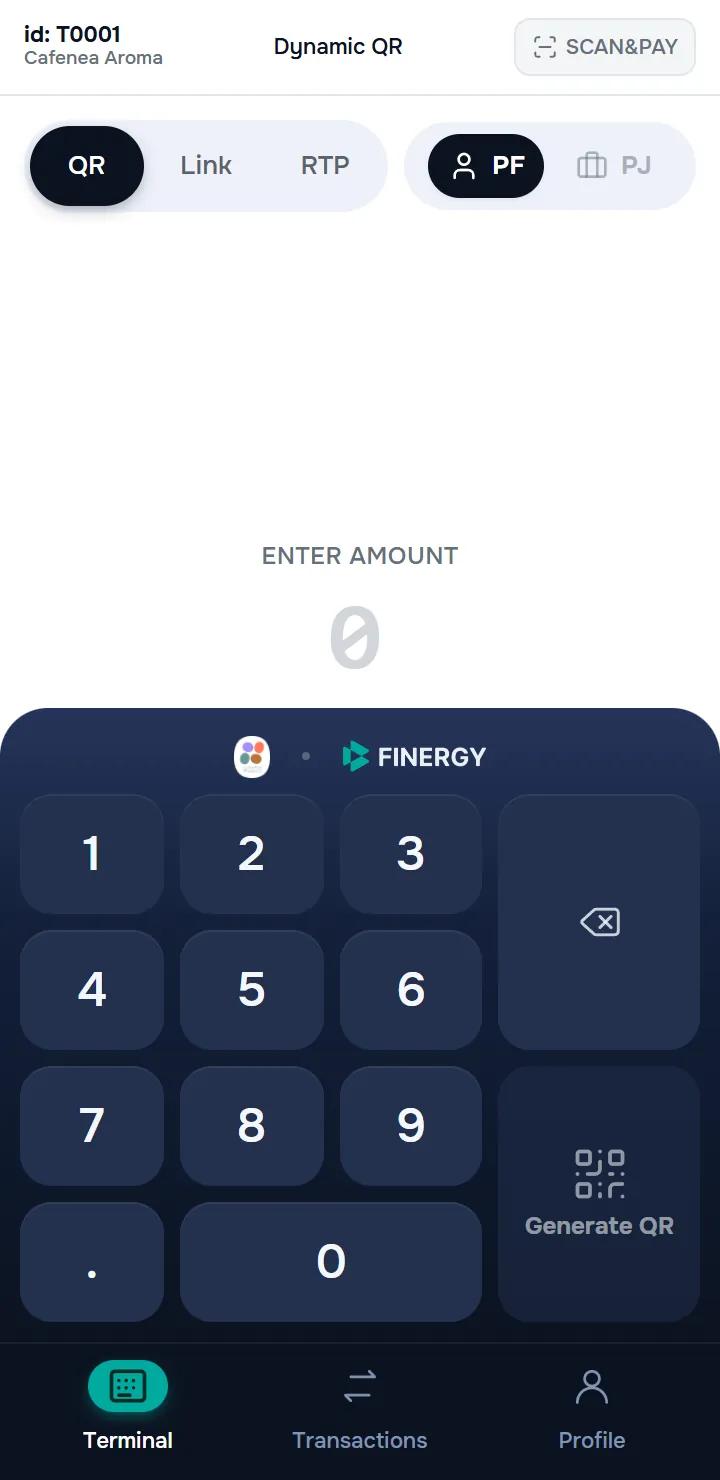
After a successful sign-in, you are taken to the terminal screen. At the bottom of the screen are the Terminal, Transactions and Profile tabs — the current tab is highlighted.
- The Terminal tab — here you manage the current working day and take payments.
- The Transactions tab — the list of operations in the open working day and the Requests tab (see Chapter 7).
- The Profile tab — user and terminal information, settings and support (see Chapter 9).
2.1 Opening the day
The terminal takes payments only within an open working day. If the day is not open, the Terminal screen shows The day is closed with the text To get started, open the day.
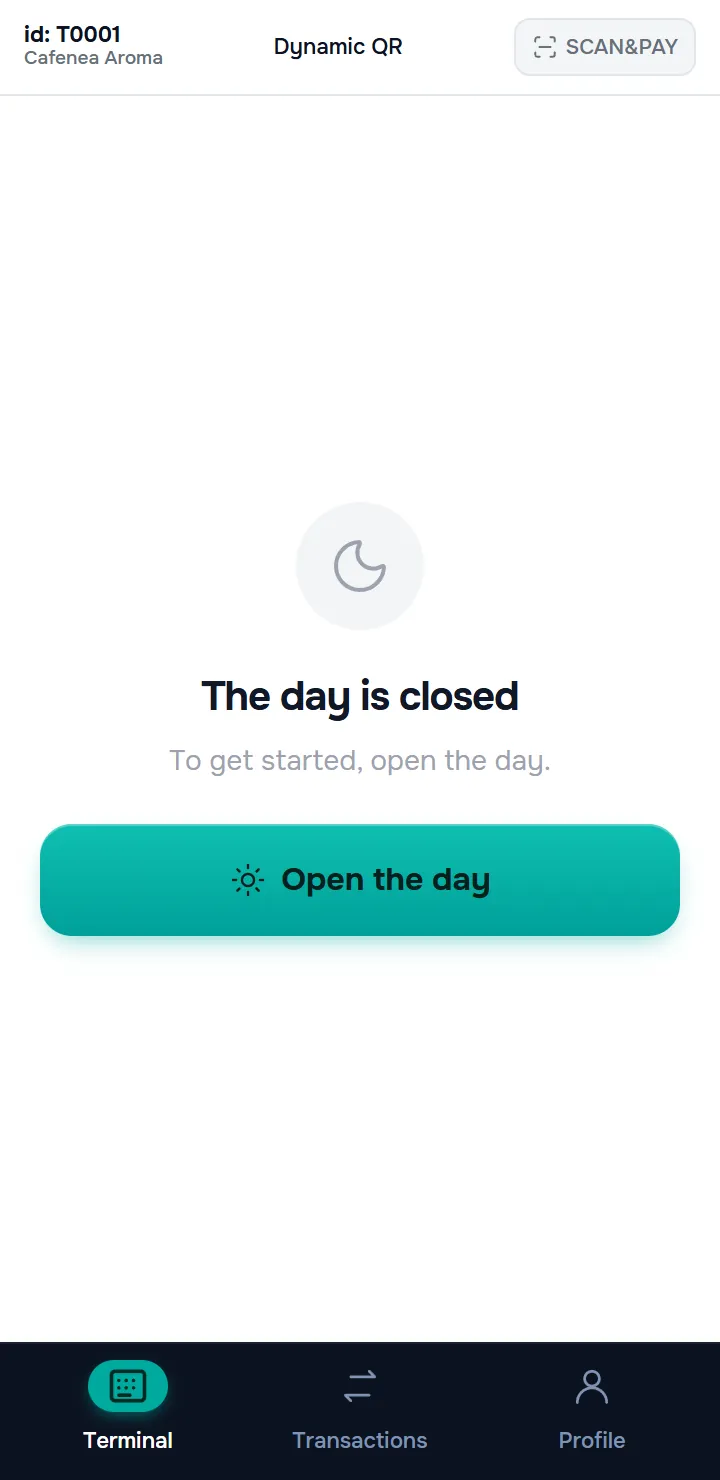
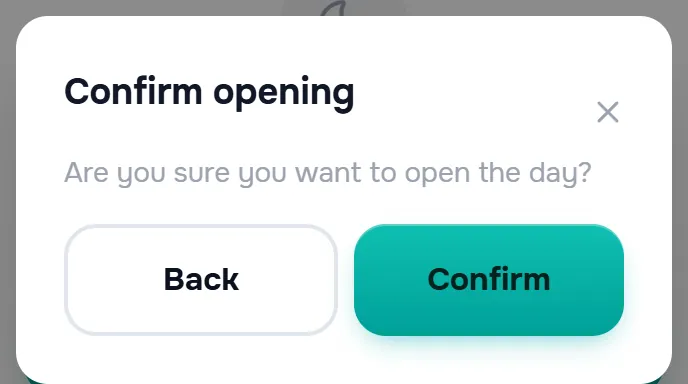
- Tap Open the day. A confirmation message appears with the Back and Confirm buttons.
- Back — return to the previous screen without opening the day.
- Confirm — the day opens, the message The day has been successfully opened appears, and the keypad becomes available.
Under the same conditions, the open-day button also appears on the Transactions screen, and in Profile — the Open button on the shift card. If another user has already opened a day on this terminal, the app tells you who opened it: the current day must be closed before a new one can be opened. On terminals with automatic login, the day opens by itself when the app starts.
Closing the day (the Z report) is done from Profile — see Chapter 9.
2.2 The Terminal screen
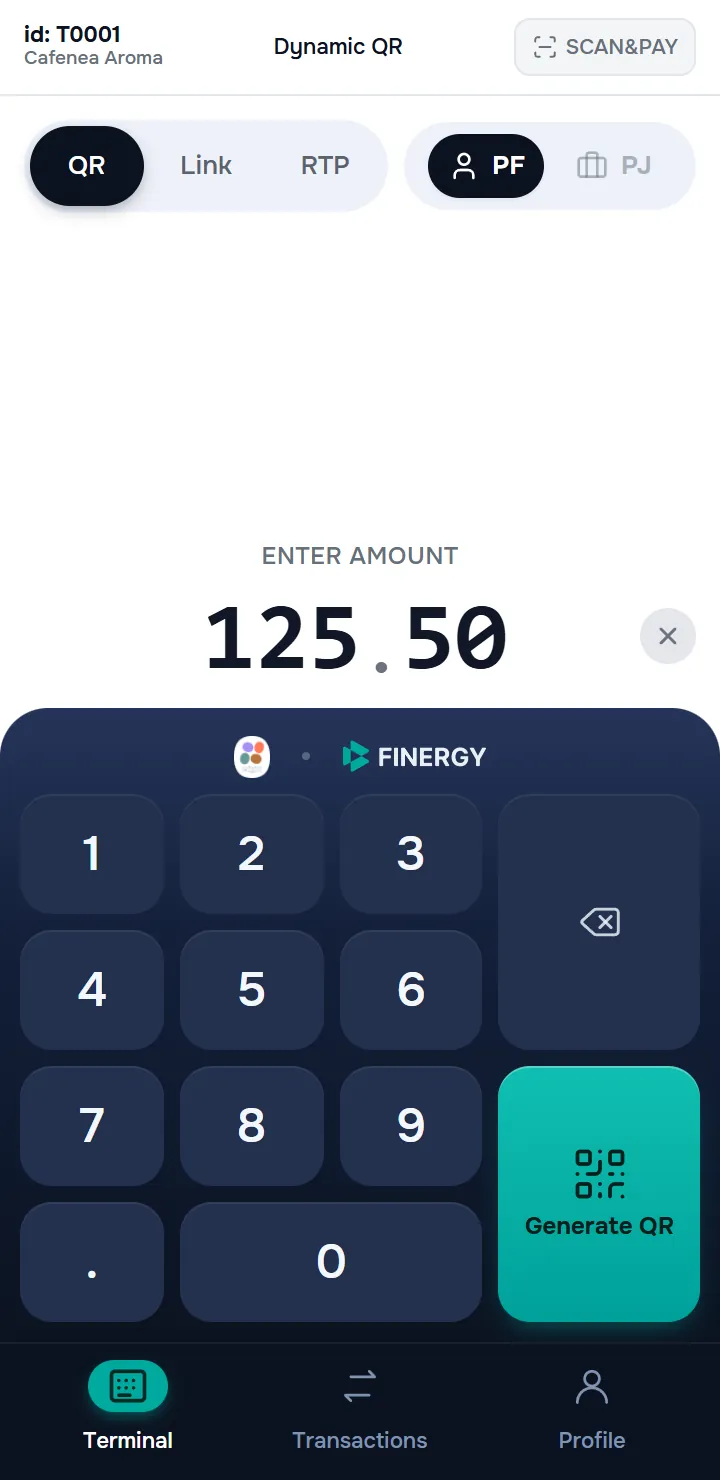
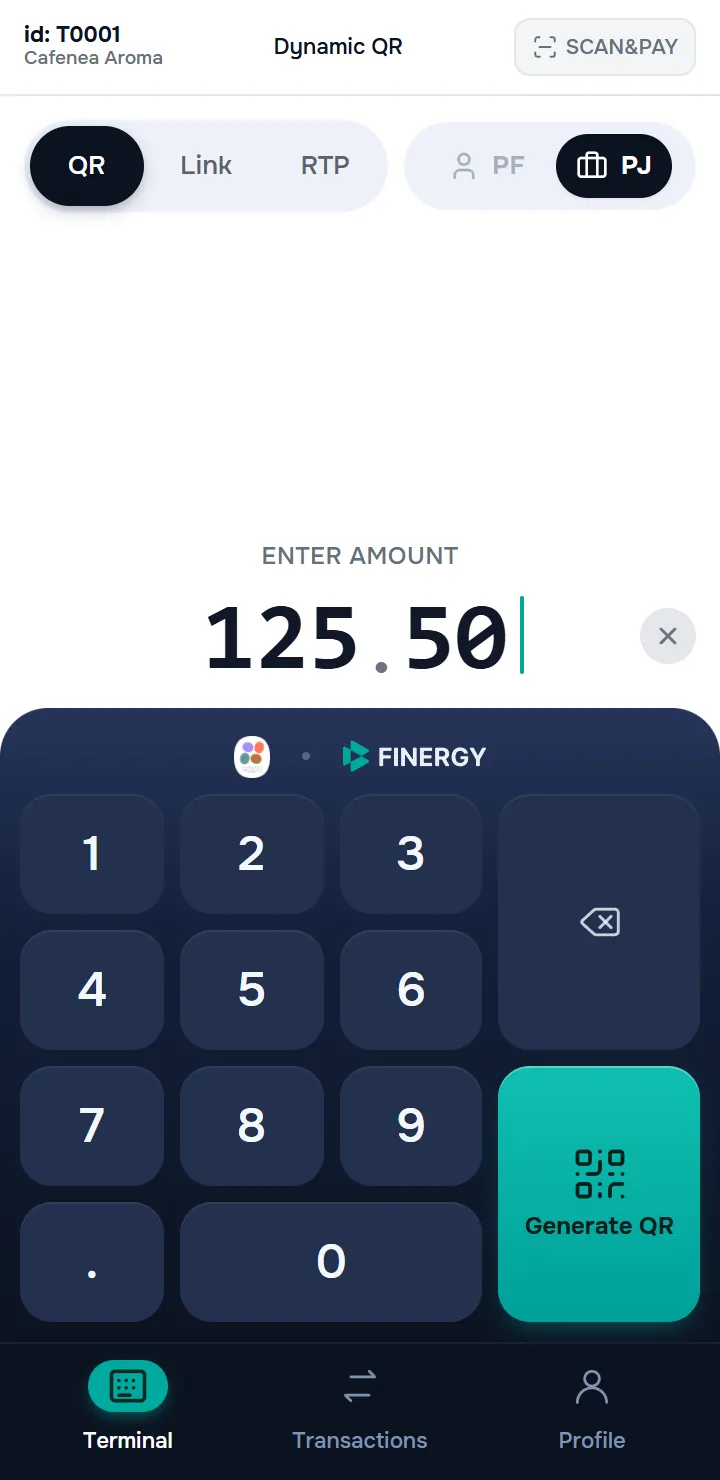
At the top of the screen you can see the terminal number (id) and the name of the point of sale — useful when there are several terminals at the location. The centre of the header always shows the configured QR code type (Static QR / Dynamic QR / Hybrid QR — Chapter 9), and on the right — the SCAN&PAY button (see below). While the terminal has an active QR code, a button with a QR icon and a green dot appears next to SCAN&PAY — it reopens the active code’s screen (Chapter 3). Underneath — the payment channel tabs, the amount field and the numeric keypad.
Payment channels — above the amount there are three tabs:
- QR — the customer scans the QR code shown on the terminal. The primary channel, used for most payments (Chapters 3–4).
- Link — you generate a payment link and send it to the customer (Chapter 5).
- RTP — you send a payment request straight to the customer’s banking app, using their phone number or IBAN (Chapter 5).
Each tab keeps the amount you entered — if you switch from QR to Link and back, the amount is not lost.
The PF / PJ switch — to the right of the tabs is the payer type switch: PF (Individual) or PJ (Legal entity). Choose PJ when a company is paying — the full details and rules are in Chapter 6.
Entering the amount — under the Enter amount prompt, the digits appear large, with a blinking cursor: you can tap between digits to move the cursor, and the cross on the right clears the whole amount. The keypad has digits, a decimal point and a delete key; the big button at the bottom right is the main action — Generate QR, Send link or Send RTP, depending on the selected tab.
2.3 Scan & Pay — paying a supplier (feature coming soon)
The SCAN&PAY button in the Terminal screen’s header is reserved for a B2B payment flow to a supplier: scanning the supplier’s QR code, verifying the bank-validated payment details, and sending the payment document for execution — unlike a regular sale, this would not be an instant payment, but a document that goes to signatures I and II in the merchant’s online banking.
In the current version of the app, the button is inactive — the feature cannot be used yet.
3. Generating the payment QR code
How the QR payment is formed depends on the QR code type selected in QR settings (see Chapter 9): dynamic, static or hybrid. After opening the working day, enter the amount (if the QR type requires one) and tap Generate QR — the message Generating QR code… appears briefly, and then the QR code fills the screen.
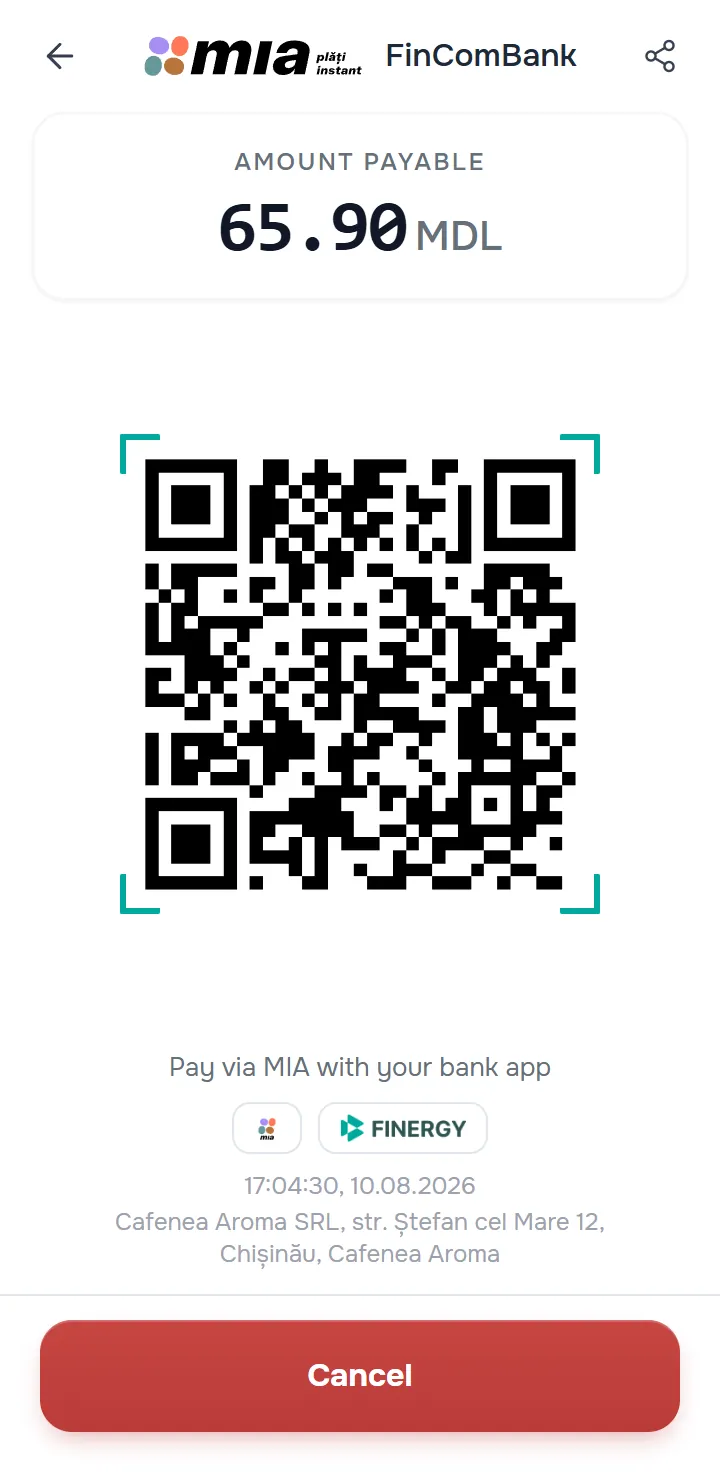
On the QR code screen you have:
- Back (top left) — closes the QR screen without cancelling the code. The keypad is replaced by the You already have an active QR link, and the header of the Terminal screen shows a button with a QR icon and a green dot — both reopen the code. The terminal can have only one active QR code at a time.
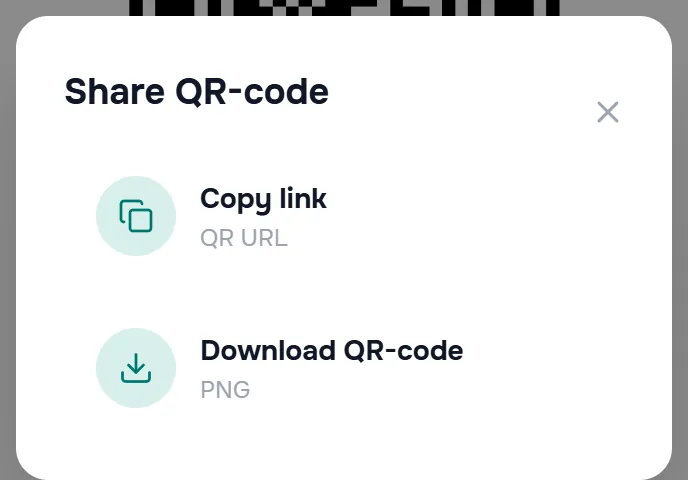
- Share (top right) — the Share QR-code window: Copy link (copies the payment link to the clipboard) or Download QR-code (saves the PNG image on the device).
- Edit amount — only for static and hybrid QR codes with an amount: change the amount or the range without generating another code.
- On Android terminals with NFC, while the QR screen is open the payment link is also transmitted automatically via NFC — the customer can hold their phone close instead of scanning.
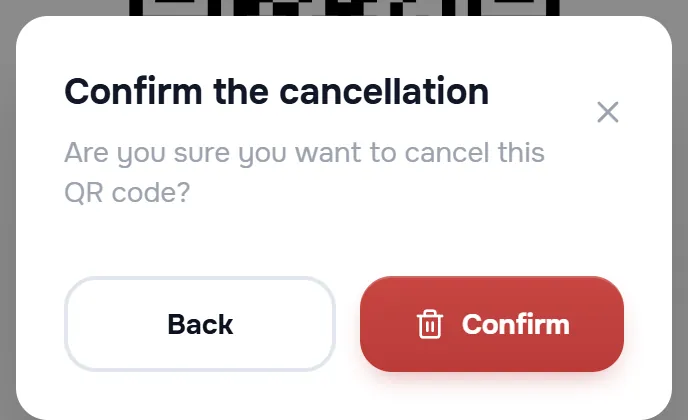
A dynamic QR code can be cancelled right from the QR screen: the Cancel button (at the bottom) asks for confirmation (Are you sure you want to cancel this QR code?) and cancels the code — for example, when you entered the wrong amount; then generate a new code with the correct amount. For static and hybrid codes the bottom button is Back and it only hides the screen — the code stays active until it’s paid or expires (Time of action, below).
The lifetime of the QR code is governed by the Time of action setting (Chapter 9). Once it expires, the code can no longer be paid.
3.1 The dynamic QR code
- A separate code is created for each individual transaction, with a fixed amount entered by the seller; the code is valid for a single payment.
- This is the usual cash-desk mode: enter the amount → Generate QR → the customer scans → the code is consumed.
- The amount cannot be changed without generating another QR code.
- Only the dynamic QR code supports the PF/PJ switch (Chapter 6) and tips (below).
- It is the default and the most secure mode: every payment has its amount confirmed by the seller.
3.2 The static QR code
- A single permanent QR code that can be paid multiple times — convenient where the payment details do not change from one customer to the next; it can be printed or saved for reuse.
- It stays active until you cancel it manually (for example, by applying different QR settings — Chapter 9). The green-dot button in the header (above) shows that a code is active and reopens it.
- Security note: static and hybrid QR codes are less secure than the dynamic one — a payment can be made without the seller confirming the amount. Use them only where this risk is acceptable (self-service, donations, a sticker on the counter).
- Depending on the Amount type selected in the settings:
| Amount type | How it works |
|---|---|
| Fixed amount | Enter the amount, then Generate QR; the amount can be changed later with Edit amount. |
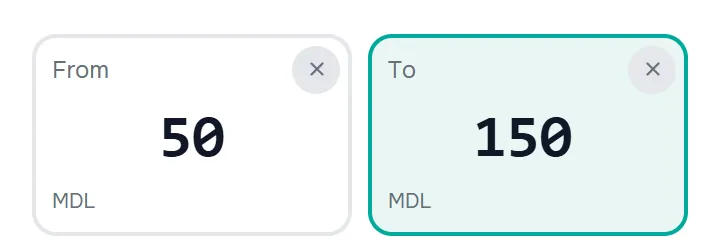
| Controlled amount | Enter the From / To range; the customer chooses an amount within this range. The minimum amount must be less than the maximum. |
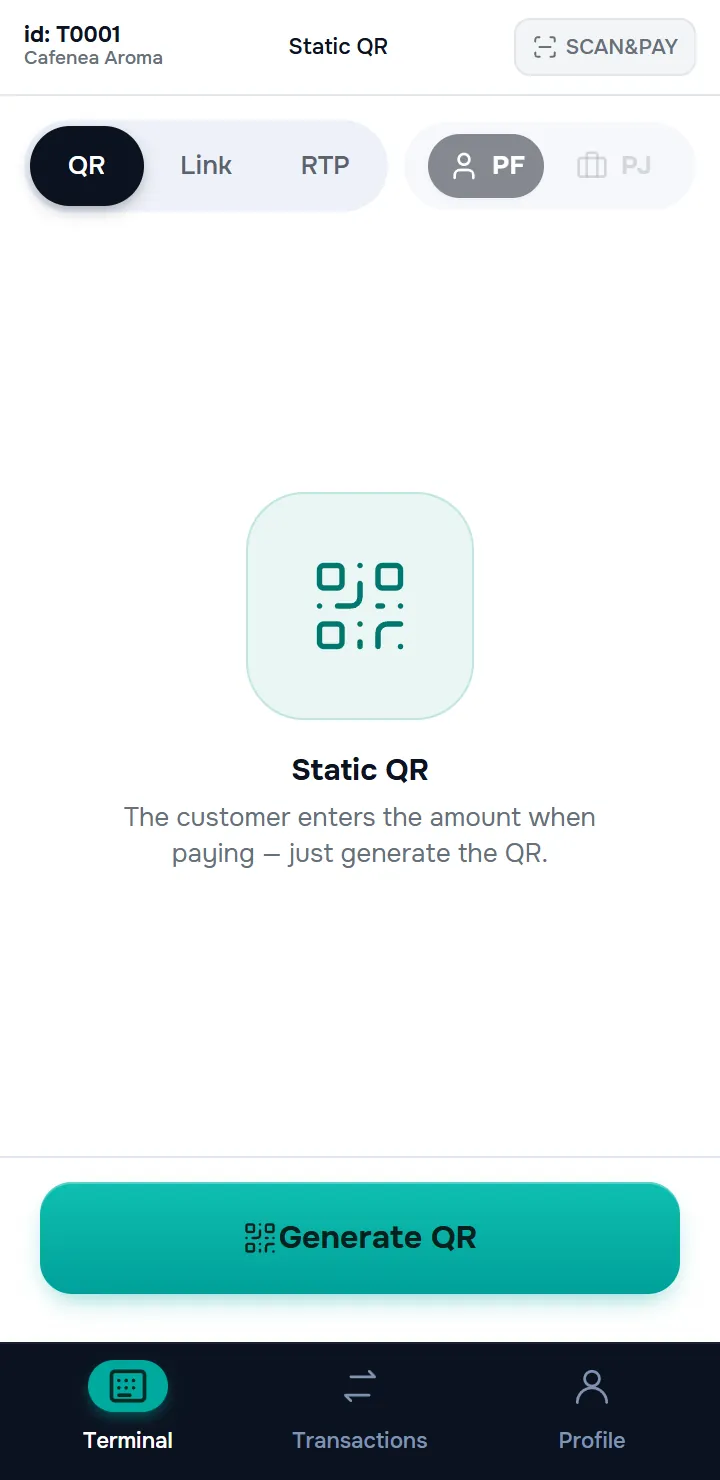
| Not specified amount | No keypad — the customer enters the amount when paying. The screen shows Static QR and the explanation, with the Generate QR button at the bottom. |
3.3 The hybrid QR code
- Combines the two types: the QR code image stays the same, but the amount can change from one payment to the next — no need to regenerate and re-display it for every customer.
- When a payment starts, the code locks and serves a single customer at a time — at most one transaction at once.
- The amount is set with Edit amount / Set amount (the Edit amount window, with an amount field or a From / To range), without changing the code image.
3.4 Tips
If the tips option is enabled for the terminal (QR settings → Enable tips, dynamic QR only), on the QR code screen the customer sees the purchase amount and the row of buttons None · +5% · +10% · +15%.
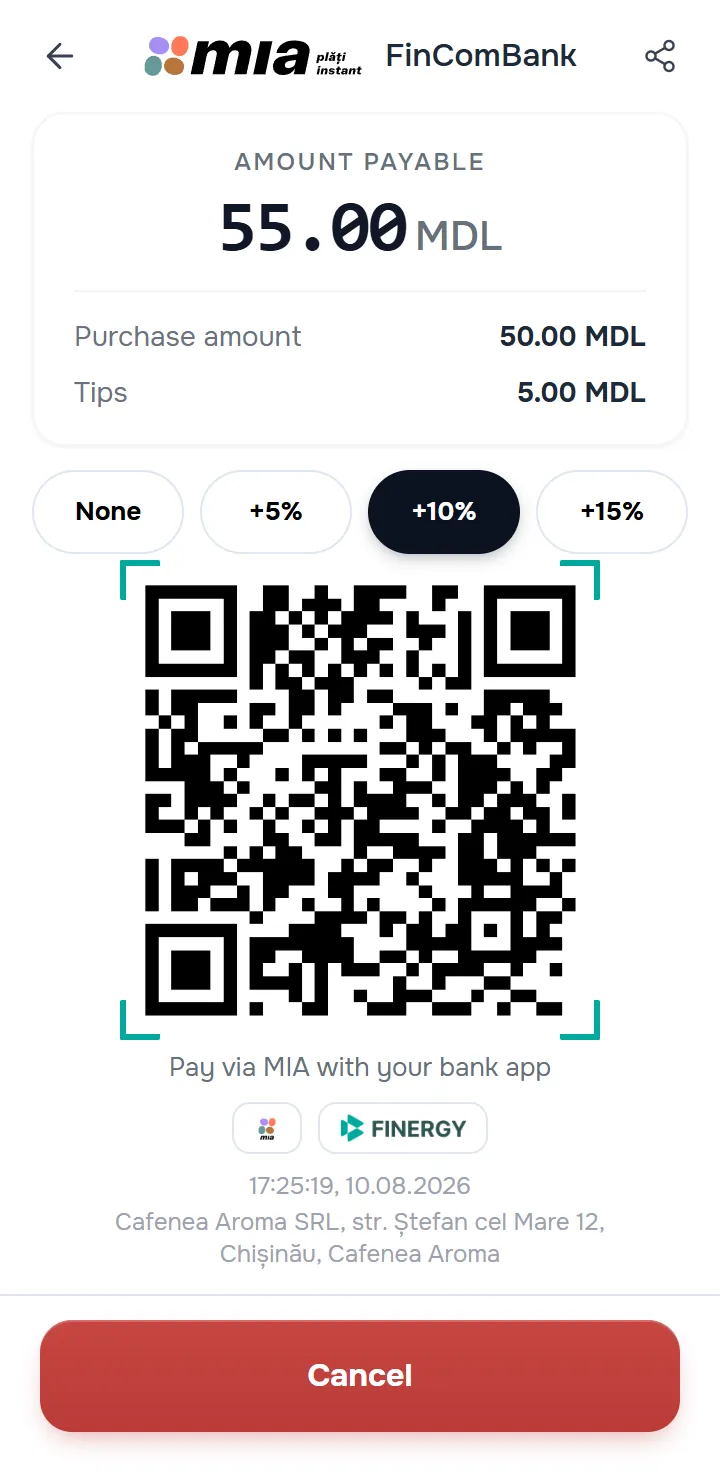
The customer picks the percentage they want before scanning — the terminal automatically regenerates the QR code with the total amount (purchase + tip). Rules to remember:
- The tip is chosen by the customer, at the screen — do not tap the buttons on their behalf.
- After each tap, the QR code is regenerated with the new amount — this is normal and takes a second.
- The percentage is always applied to the purchase amount — changing the percentage repeatedly does not add tip on top of tip.
- The choice stays tied to the active QR code: after an app restart, the selected percentage and the amount are restored.
- Tips are settled to the tips IBAN configured by the bank (Chapter 9).
In the transaction details and in the reports, the tip appears on a separate line: Purchase amount and Tips.
4. Paying with the QR code
Once the QR code is displayed, turn the terminal towards the customer. The customer opens their bank’s app, scans the code and confirms the payment via MIA. The terminal checks the payment status by itself every few seconds — you do not need to tap anything.
A delay of up to five seconds between the customer’s confirmation and the green screen is normal. If the customer says they have paid but the screen has not changed, wait a few seconds, then check the transaction list (Chapter 7) — a confirmed payment appears there.
4.1 Successful payment
When the payment is confirmed, the green Payment received screen appears: the amount received, the time and date, the transaction number. For legal-entity payers, the payer’s name and IDNO are shown as well.
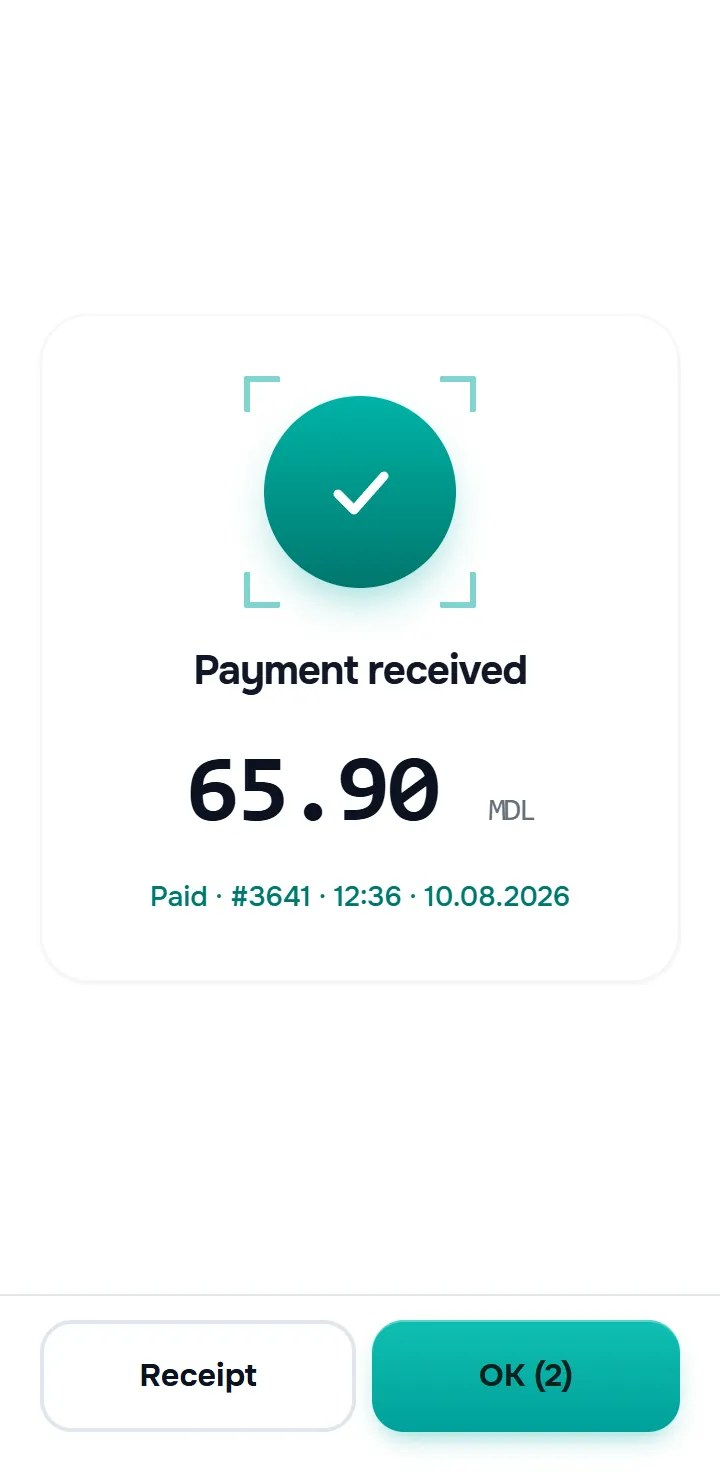
At the bottom there are two buttons:
- Receipt — opens the transaction receipt, with printing and download options (see Chapter 8). On terminals with a printer, the receipt is also printed automatically, right after the payment.
- OK — closes the screen and returns to amount entry. The button has a timer: when the countdown runs out, the screen closes by itself.
4.2 Payment errors
If the payment did not complete, the Payment error screen appears with a description of the situation:
- QR code expired. Please generate a new QR code. — the customer did not pay within the code’s validity time;
- Unfortunately, the payment did not go through. The QR code has been cancelled.
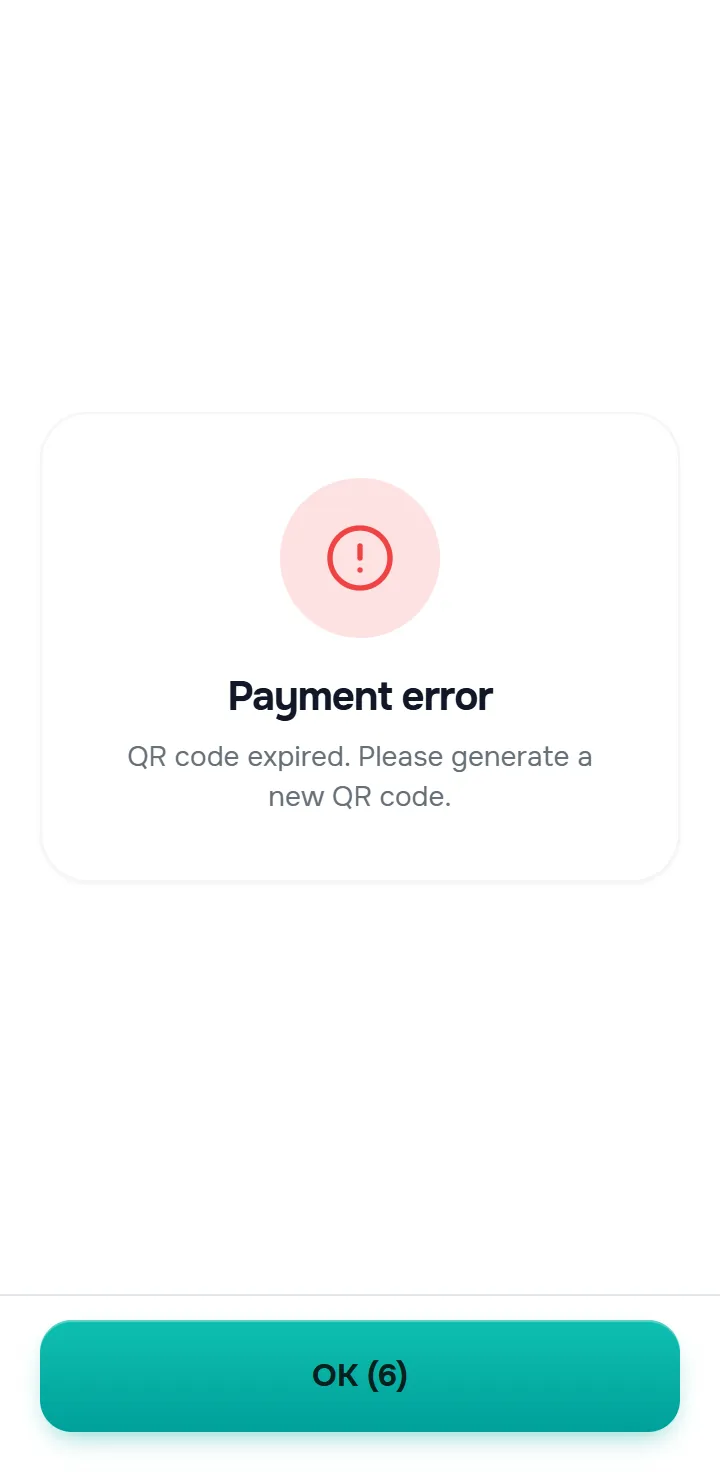
In both cases the QR code is consumed — for a new payment, enter the amount and generate a new code.
If the QR code cannot be generated (the Error when generating QR code screen — Something went wrong. Try again or go back to the terminal.), tap Retry or Back.
5. Payment link and the RTP request
Besides the QR code, the terminal can take payments remotely: through a payment link sent to the customer or through a payment request (RTP) delivered straight into the customer’s banking app. Both start from the Terminal screen, on the Link and RTP tabs.
5.1 Payment link
Use the Link channel when the customer is not next to the terminal — for example, for phone orders.
- On the Link tab, enter the amount and tap Send link.
- Creating payment link… appears on the screen, then the app shows the created link: the amount, a QR code leading to the payment page, the link itself, the description field and the action buttons.
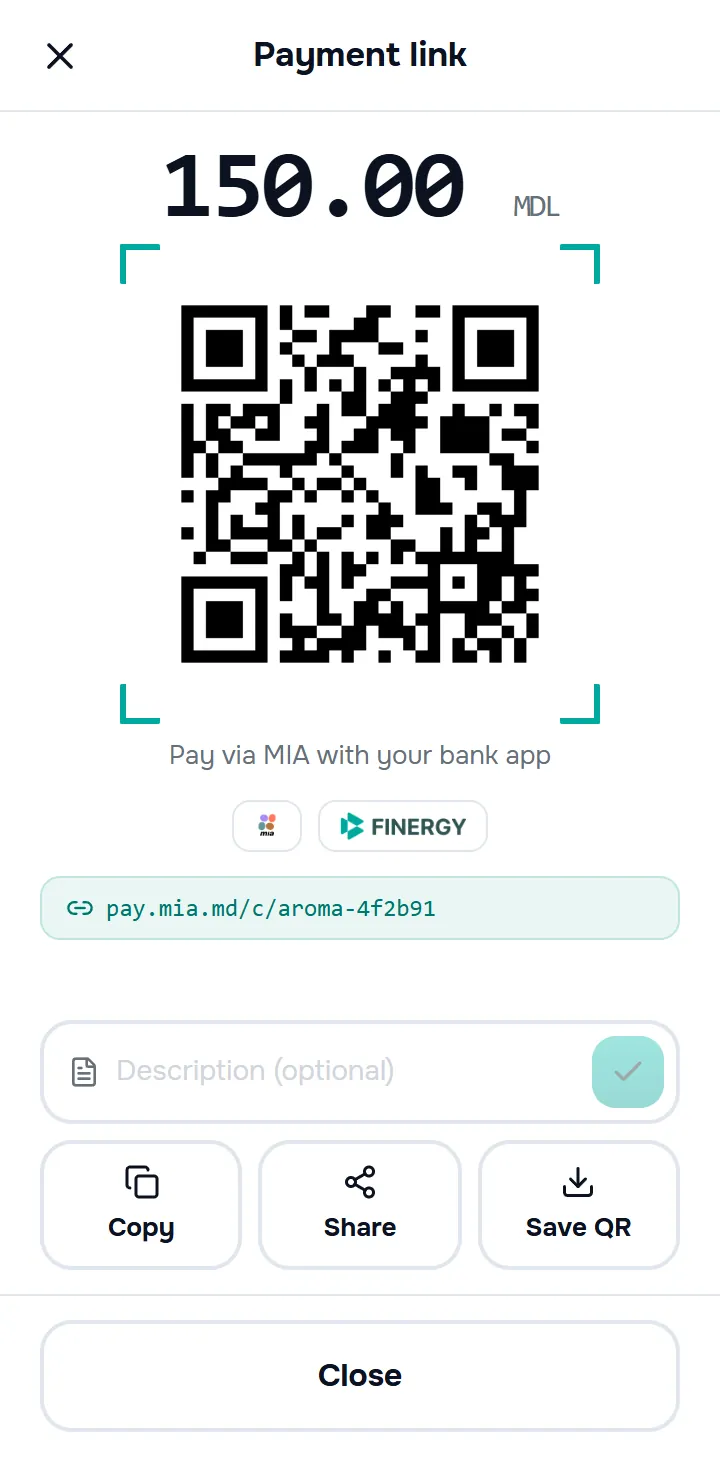
- Send the link to the customer: Copy (then paste it into a chat/SMS), Share (via the device’s apps) or Save QR (the code image).
- Description (optional) — text the customer sees on the payment page (e.g. what the payment is for). Type it into the field above the buttons and tap the check mark: the link is created anew, now with the description. Note: the QR code and the address change — send the customer the link you get after applying the description, not the old one.

- The screen tracks the payment while it stays open. On confirmation, the Payment received screen appears, with the New payment button; if the bank declines the payment, an error screen shows instead.
- Close (at the bottom) — leave this screen and return to the keypad. Important: the button does not invalidate the link — it stays payable by the client. If you sent the wrong link and don’t want it paid, warn the client directly.
- You do not have to stay on this screen: you can serve the next customer. The link has no expiry — it stays active until it is paid, and you can always check its status or re-send it from the Requests tab.
You can always find the links you have sent and their status in Transactions → the Requests tab (Chapter 7).
5.2 The RTP request
RTP (Request to Pay) sends the payment request straight into the customer’s banking app, using their phone number or IBAN.
- On the RTP tab, enter the amount and tap Send RTP.
- The RTP request screen has a single field — Client phone or IBAN — the app recognises what you type on its own:
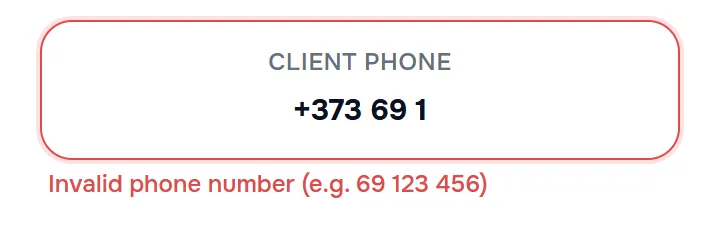
- a phone number — type the 8 digits of the Moldovan number; the +373 prefix and digit grouping appear automatically;
- an IBAN — start typing the account (MD…): from the first letter the field switches to IBAN and the letters are capitalised automatically.
- Tap Send request. The value is checked only now: a wrong number shows Invalid phone number (e.g. 69 123 456), a wrong account — Invalid IBAN (e.g. MD24AG000225100013104168); correct the field and send again.
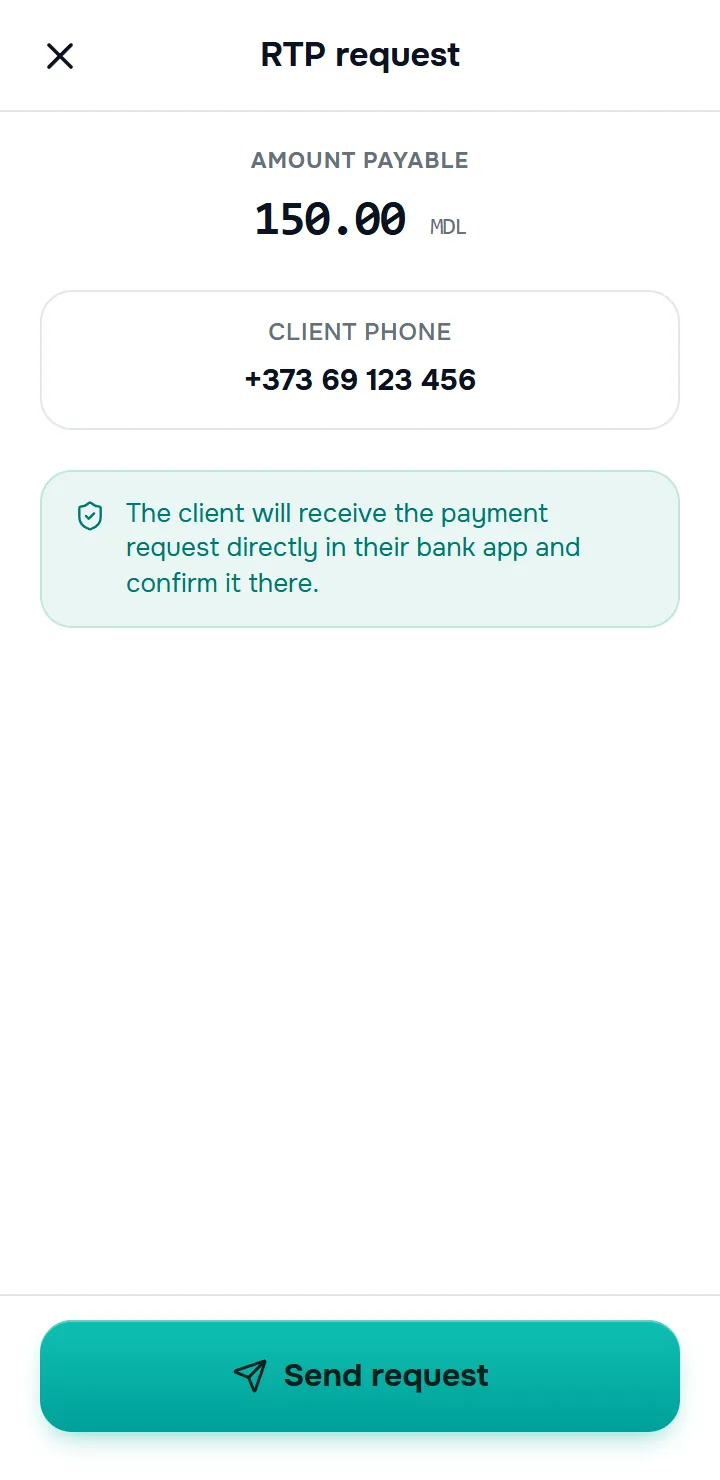
- The customer will receive the payment request directly in their bank’s app and confirm it there.
- After sending, the app returns to the keypad — you do not have to wait for the confirmation at the terminal: you can serve the next customer. You track the request status (Pending / Expired / Declined) in Transactions → the Requests tab, and the confirmed payment appears in the transaction list.
- Note: a sent RTP request cannot be cancelled from the terminal. If you got the amount or the recipient wrong, let the request expire and send another one.
6. Individual (PF) or legal entity (PJ) payer
The PF / PJ switch to the right of the tabs on the Terminal screen tells the app who you expect to pay: an individual (the default) or a company. Choosing correctly starts the payment on the right flow (the customer’s business banking app when a company pays) and marks the operation in your list. The financial side is not decided by this switch directly: the transaction type (TTC) is set by the payer’s bank based on who actually pays, and TTC governs both the tariff and the side the banks charge the fee against — on a PF payment the fee is deducted from the amount credited to the merchant; on a PJ payment, from the payer’s account.
6.1 How the switch works
| Aspect | Behaviour |
|---|---|
| When it is active | Only on the QR channel and only for the dynamic QR code type. |
| When it is locked | On Link, RTP and static/hybrid QR the switch stays visible but inactive; when tapped, the app explains: Available only for a dynamic QR. |
| What it changes | Opens the B2B flow in the customer’s bank app (asks them to confirm from their business app) and marks the operation in your list with the company’s name and payer IDNO. |
| Reset | When you leave the QR channel or change the QR type, the selection returns to PF — a previously selected PJ does not “travel” to another channel. |
6.2 What you see on a PJ payment
- The Payment received screen and Transaction details additionally show Payer (the company name) and Payer IDNO.
- In the transaction list, payments can be filtered with the PF / PJ chips — a filtering axis independent of the channel (Chapter 7).
- In Transaction details, the Transaction type code (TTC) field reflects the type the payer’s bank assigned to the received operation — the tariff is calculated against it, and it determines the side the fee is charged to (merchant on PF, payer on PJ). If the bank has questions about the fee for a payment, read this code out to them.
- In practice: on PF payments, the amount credited to the account is smaller than the amount paid by the customer by the bank’s fee; on PJ payments, the full amount is credited and the fee is charged to the payer.
6.3 Practical recommendations
- If the customer pays from a business banking app, ask whether the payment is on behalf of a company — and only then switch to PJ. That way the customer sees the right flow in their bank’s app, and the operation appears in your list with the company’s name.
- If you forgot to switch to PJ, the payment still reaches you with the correct type: the payer’s bank sets the transaction type (TTC) by who actually paid, and through it — both the tariff and the side the fee is charged to (on a company payment the payer still bears the fee even if the switch stayed on PF at the terminal). What is missing is the local mark — in Transaction details, Payer (the company name) and Payer IDNO may not appear. Those fields cannot be filled in or corrected; the app does not retroactively change the mark on a received payment.
7. The transactions screen and refunds
The Transactions tab opens the screen with the list of operations for the current working day, in reverse chronological order, plus the Requests tab — the payment links and requests you have sent. If the day is closed, the screen shows The day is closed with the Open the day button instead of the list.
7.1 The transaction list
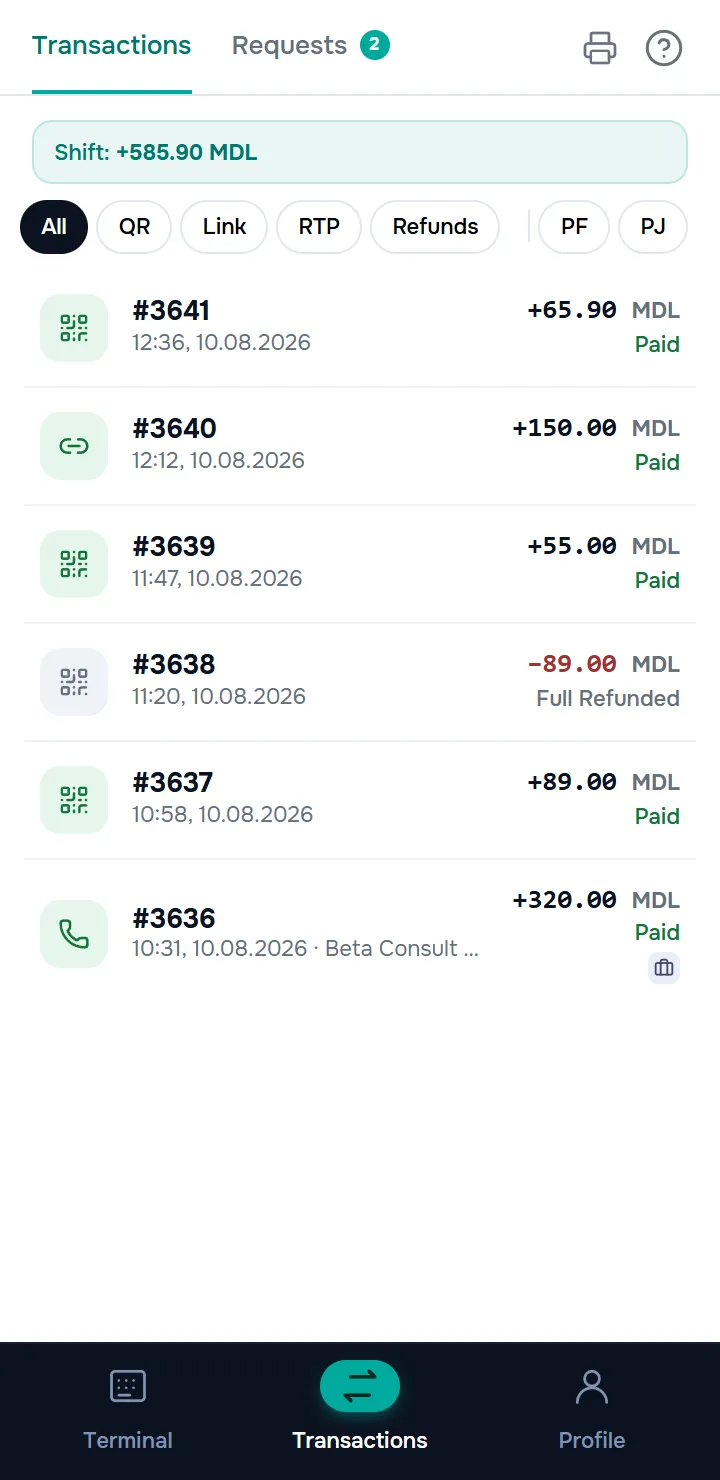
- Under the title you can see the day’s total: Shift: +… MDL and, if tips are enabled, Tips: ….
- The chips under the total filter the list: All, QR, Link, RTP, Refunds (refunds only); separately, on the right — PF / PJ by payer type (a second tap removes the filter).
- Each row shows the channel, the transaction number, the time and the amount: green with + for payments, red with − for refunds; the transaction status is written under the amount.
- The list scrolls endlessly (it loads automatically as you scroll) and refreshes itself every few dozen seconds — new payments appear without any action on your part.
- The tab bar has two buttons in the top right: the printer icon (on the Transactions tab only) opens the X report — the current day’s totals without closing it (Chapter 8); the ? button opens the How do customers pay? window — a short explanation of the QR, Link and RTP channels.
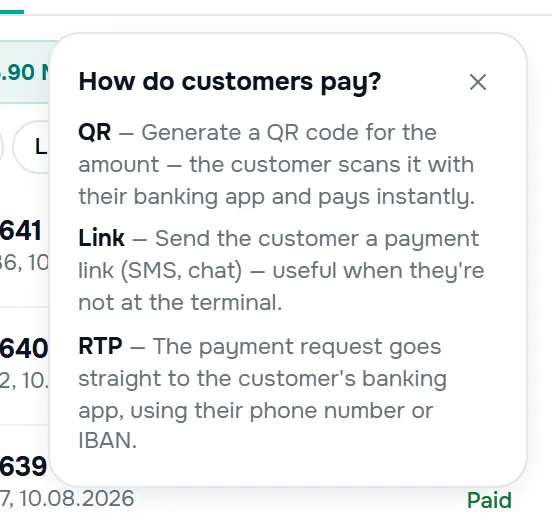
Transaction statuses:
| Status | What it means |
|---|---|
| Paid | Successful payment. |
| Partial Refunded | Part of the amount has been returned to the customer. |
| Full Refunded | The whole amount has been returned to the customer. |
7.2 The Requests tab
The Requests tab (next to Transactions, with the counter of active requests) lists the payment links and RTP requests sent from the terminal.
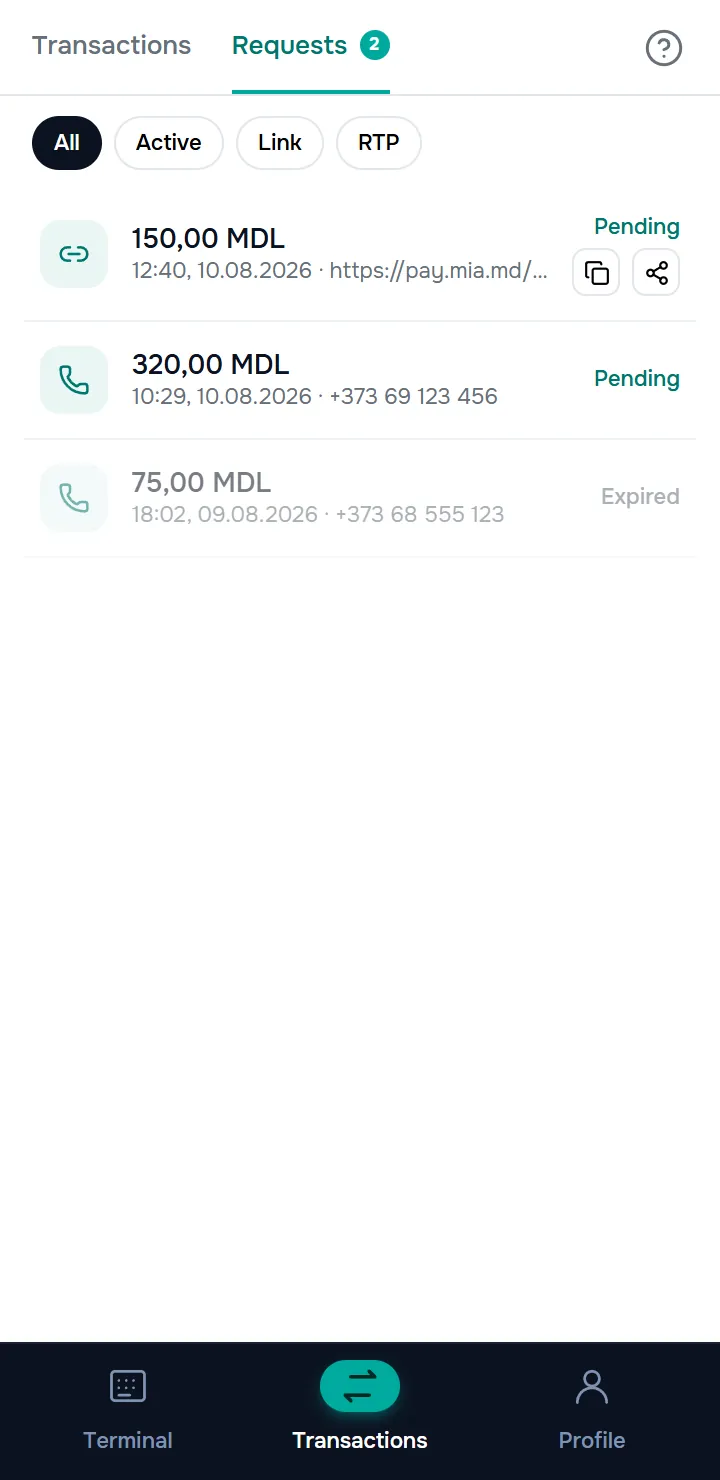
- The chips filter the list: All, Active (pending only), Link, RTP.
- Each row shows the channel, the amount, the date and the destination (the link, the phone number or the IBAN), with the status on the right: Pending, Expired or Declined (also covers technical processing failures, not just a decline by the customer or the bank).
- Pending links have copy and share buttons on the row — you can re-send the same link to the customer.
- A request confirmed by the customer disappears from Requests and appears as a paid transaction in the main list. A sent request cannot be cancelled from the terminal — if it is no longer needed, wait for it to expire.
- The request queue is tied to the terminal, not to the working day — requests sent yesterday remain visible after the day is closed.
7.3 Transaction details
Tapping a transaction opens the Transaction details screen: the signed amount and the status, then the card with the payment data:
| Field | What it contains |
|---|---|
| Date | The date and time of the payment. |
| Payer / Payer IDNO | The name and IDNO of the paying company — PJ payments only (Chapter 6). |
| Channel | The payment’s collection channel. In the current version this field can always show “Dynamic QR”, regardless of the actual channel — if it looks wrong for a Link or RTP payment, check the actual channel with the filter chips in the list (above). |
| Purchase amount / Tips | The breakdown of the amount, when there is a tip. |
| Transaction ID | The transaction number in the system — quote it to support whenever there is an issue with the payment. |
| RRN, Approval code | The technical identifiers of the payment — the bank uses them when investigating disputes. |
| SWIFT message type / ID, Payer’s bank SWIFT code | The ISO 20022 payment message data — needed by the bank for reconciliation. |
| Transaction type code (TTC) | The tariff code of the operation — the bank uses it to apply the correct fee (Chapter 6). |
You do not need to understand the technical fields — it is enough to know where they are, so you can read them out to the bank over the phone.
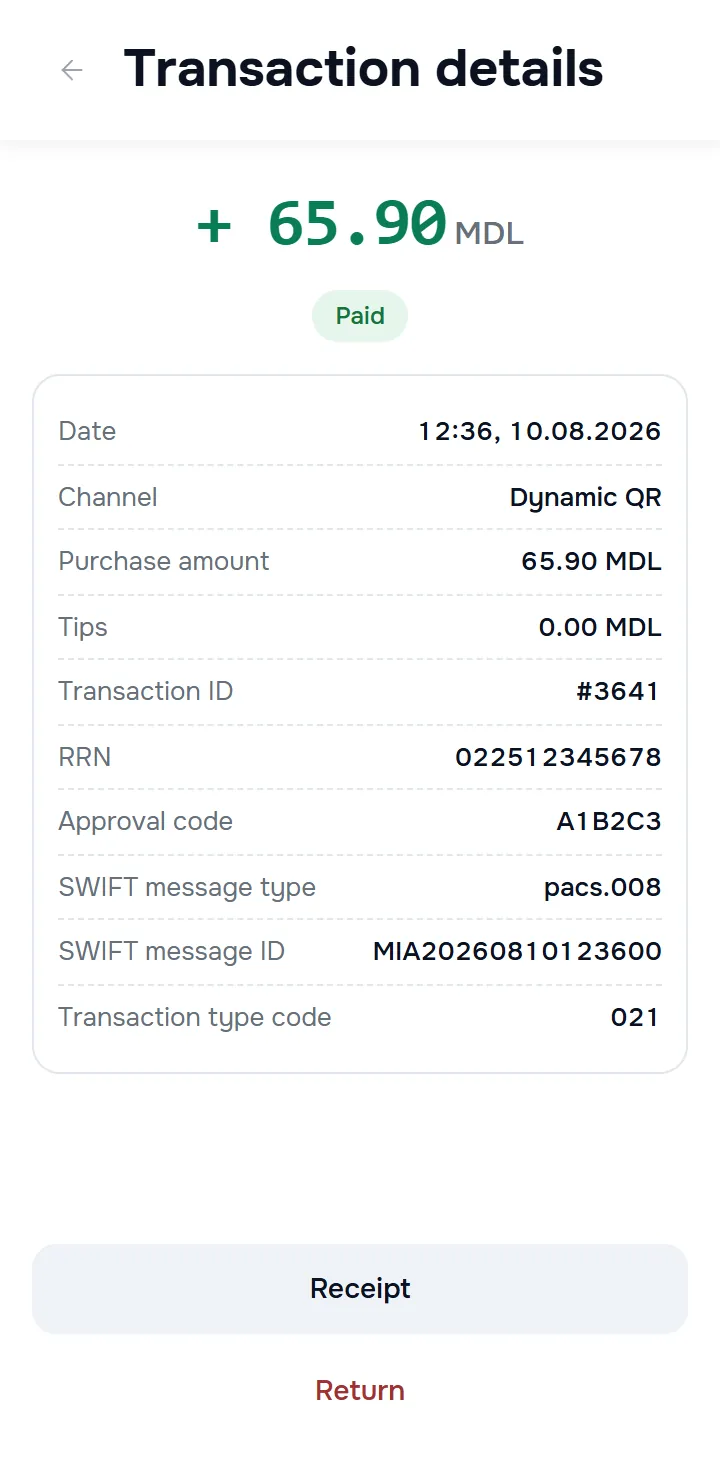
For paid transactions, there are two actions at the bottom:
- Receipt — opens the transaction receipt, with printing and download options (Chapter 8).
- Return — starts the refund (below).
The arrow in the top left corner returns to the transaction list.
7.4 Refunds
A refund returns the money of a paid transaction to the customer — in full or in part. The refund is irreversible and will appear in the Z report of the shift in which you make it (not the shift in which the sale happened); it can be done only while the working day is open.
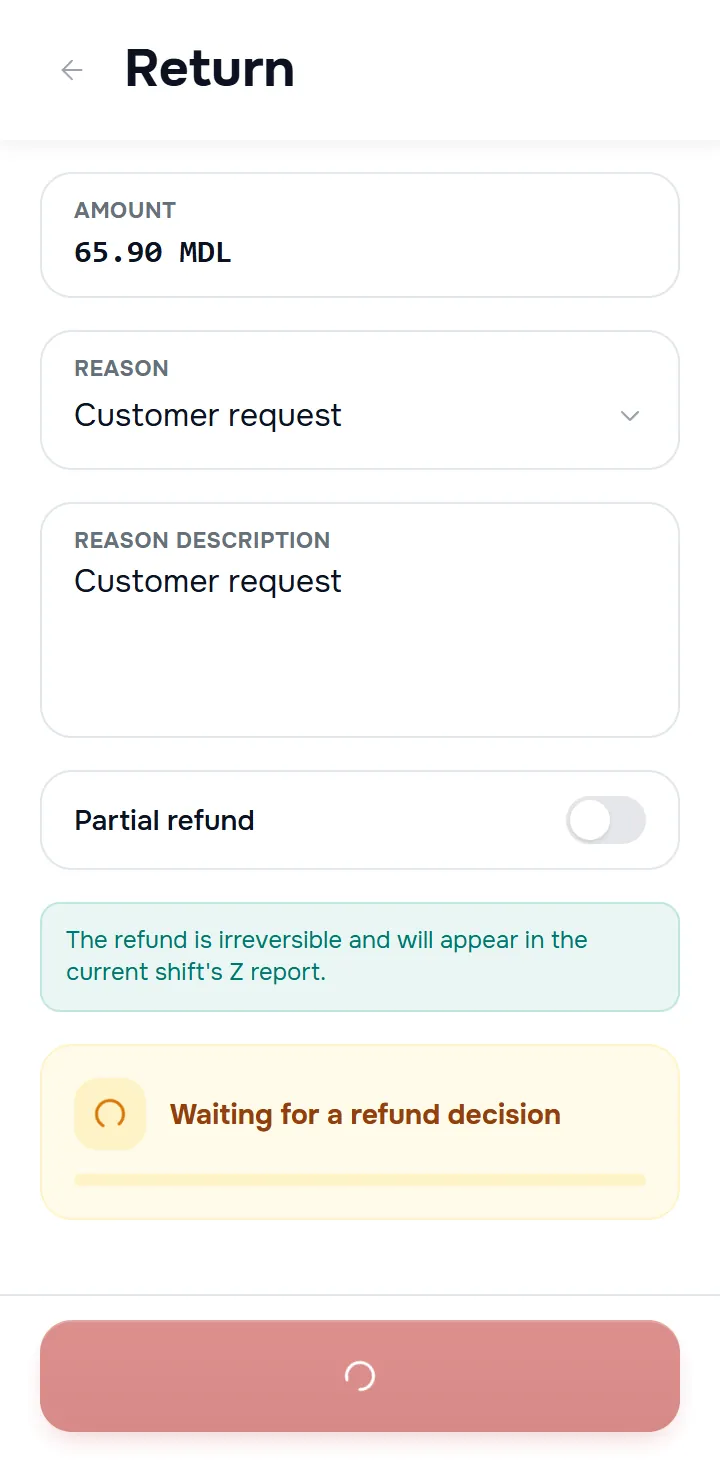
From Transaction details, tap Return. On the refund screen:
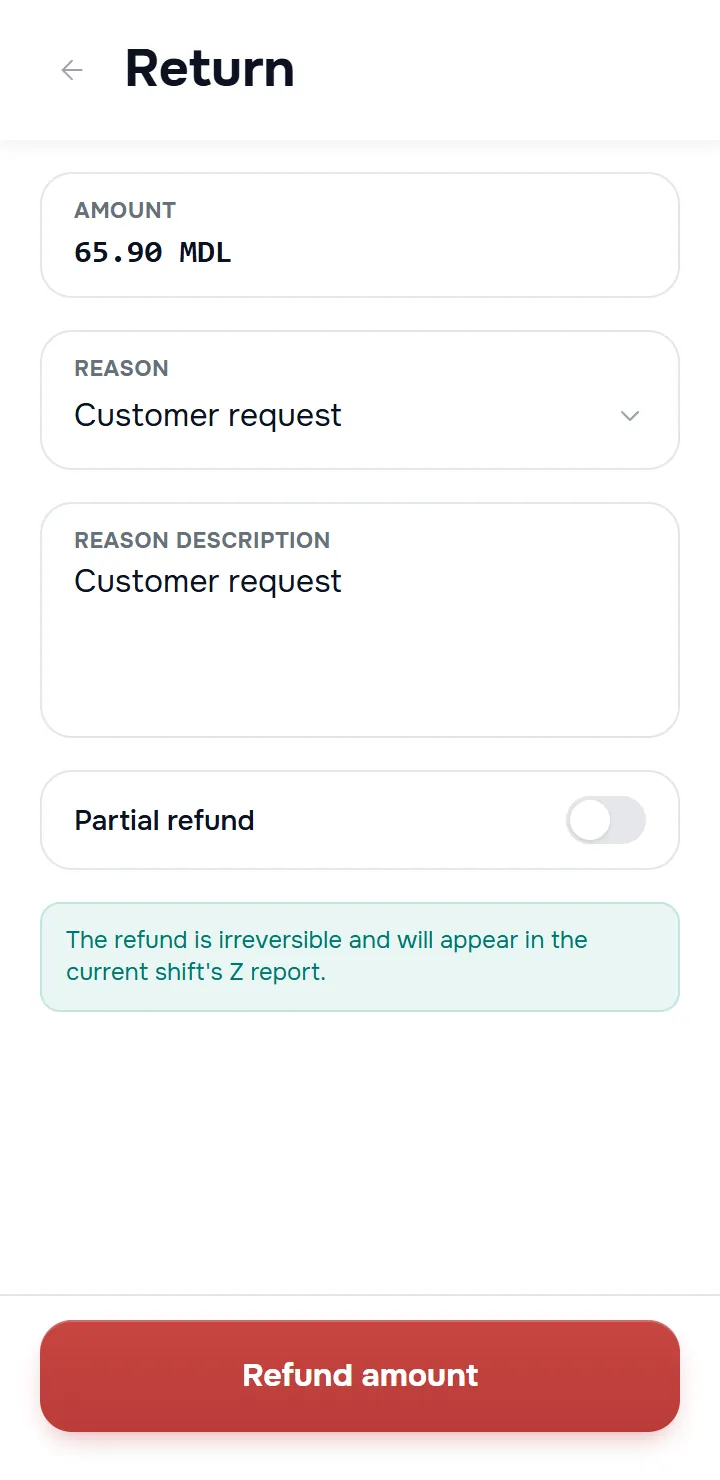
- Amount — the transaction amount, shown for reference.
- Reason — choose the refund reason from the list (the customer’s request is selected by default). The Reason description field is filled in automatically with the name of the reason — you can add details.
- For a full refund, leave the Partial refund switch off and tap Refund amount.
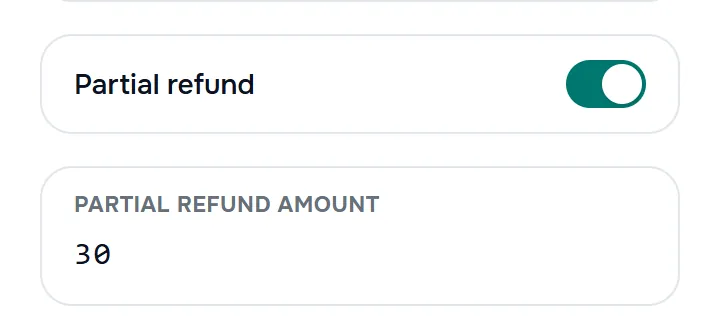
Partial refund: turn on the Partial refund switch and enter the amount in the Partial refund amount field. The amount must be greater than zero and cannot exceed the transaction amount — otherwise the app shows the corresponding error. After a partial refund, the transaction status becomes Partial Refunded.
The result: after you tap the button, the request goes off for processing — the Waiting for a refund decision block with a progress bar appears on the screen. Wait on this screen; the check usually takes a few seconds.
- Refund request confirmed — the refund succeeded; the app opens the details of the refund transaction (the amount with −).
- Refund request rejected — the refund was not approved; the amount stays with the merchant.
- If the response is delayed, the app asks you to check the status in the transaction list — the refund appears there once it is processed.
- Refunds are not possible for this transaction. — the transaction can no longer be refunded; contact the bank if the customer insists.
8. Printing receipts and reports
The app can print receipts and reports on the terminal’s printer (if the device has one) and can save any document as a PDF file.
8.1 The print screen
Receipts and reports open in the same preview screen: the document on a dark background, with the actions at the bottom.
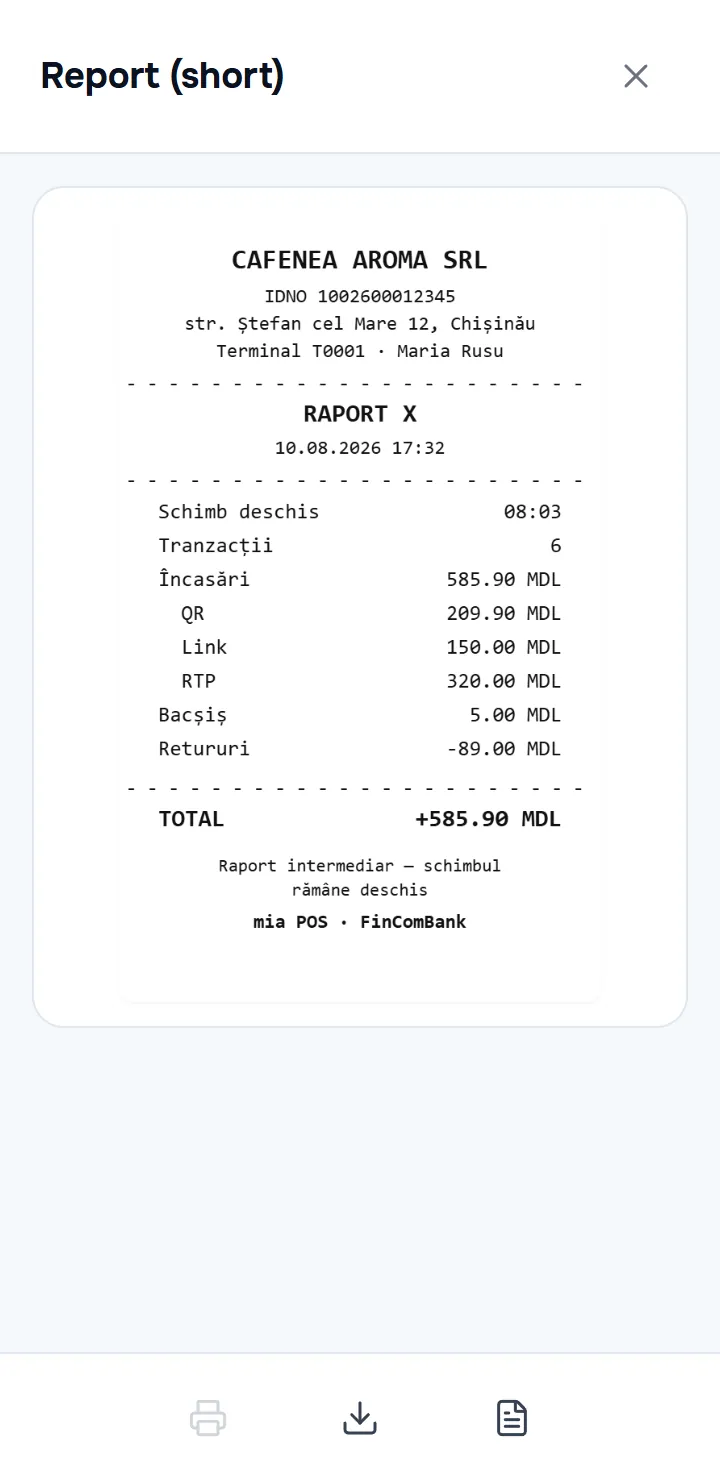
- Print — prints the document on the terminal’s printer. If there is a problem, the app shows the exact cause: no paper, cover open, printer busy or overheated, Bluetooth turned off, etc. Fix the indicated cause and try again; if the terminal has no printer, the document is only shown on screen — that is normal.
- Save PDF — downloads the document as a file on the device.
- For the X and Z reports, the switch on the right toggles between Report (short) and Report (full) — the full version includes the breakdown of operations. The short version opens by default.
- X (top) closes the preview; the app asks for confirmation (Close the report page?).
- If generating the document fails (Generation error), tap Retry generation? or Go back.
8.2 Automatic receipt printing
After a successful payment, the terminal automatically prints the transaction receipt — no extra action from the seller is needed. The feature works on terminals with a printer; the receipt includes the transaction details: the amount, the date and time, the merchant information.
At points of sale where the till software is integrated with miaPOS (for example SmartOne/PAX terminals), the amount may already arrive filled in on the Terminal screen, without you typing it — the till sends the payment request directly to miaPOS. In this case, after payment the app may automatically return to the previous screen or close itself, and control goes back to the till app — this is not an error.
8.3 Manual receipt printing
Besides automatic printing, you can open the receipt at any time:
- right after the payment — the Receipt button on the Payment received screen (Chapter 4);
- later — from Transactions → Transaction details → Receipt (Chapter 7).
The receipt opens in the preview screen, from which you can print or save it — useful when the customer needs an extra copy.
8.4 The X report
The X report shows the current day’s totals without closing the day — useful for mid-shift checks, without affecting the shift.
You open it from the Transactions screen: the printer icon button, top right on the tab bar (visible on the Transactions tab). The report opens in the preview screen, with the short/full option, just like the other documents.
8.5 The Z report
The Z report is generated when the working day is closed and locks in the shift’s totals for good (see Chapter 9 — Closing the day). After closing, the report opens automatically in the preview screen for printing or saving.
9. The profile screen
The Profile tab gathers the user and terminal information, working day management, the settings and support.
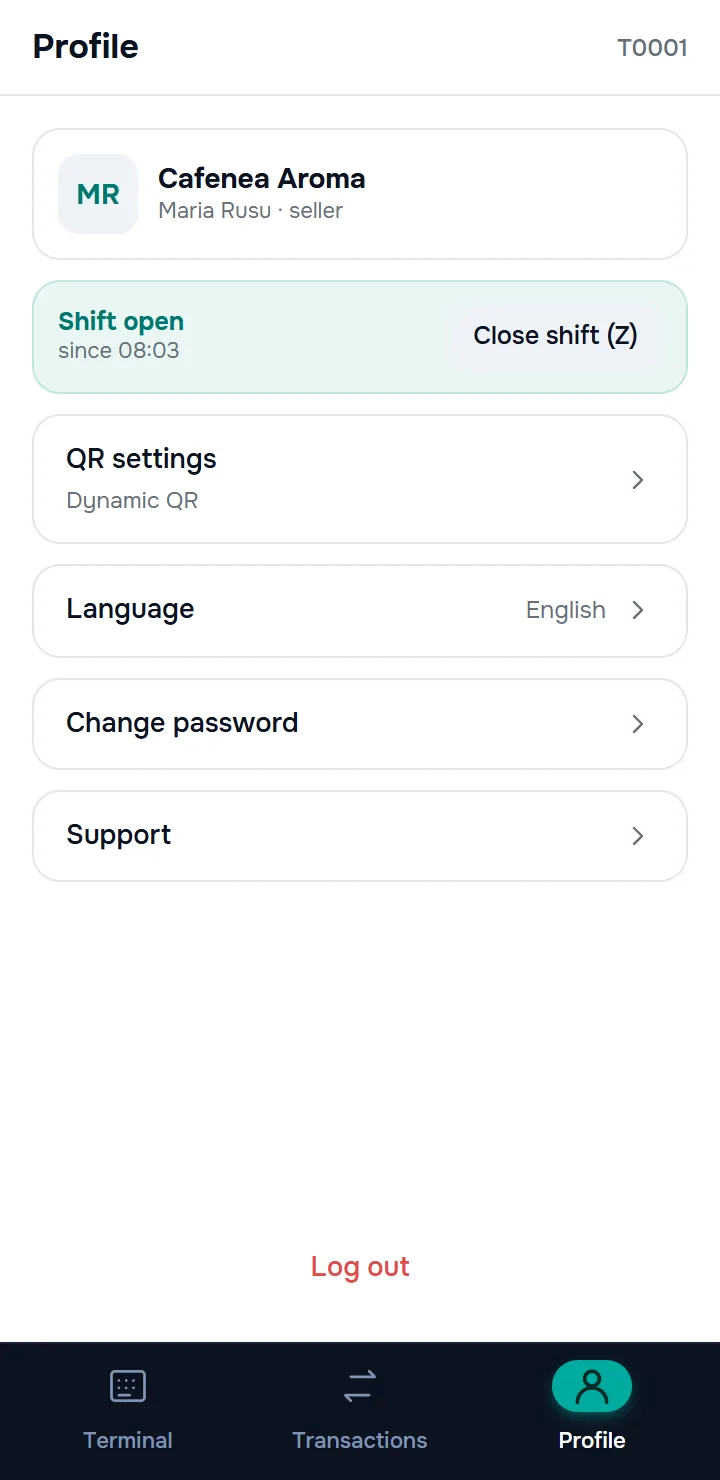
- At the top: the name of the point of sale and the name of the signed-in seller; in the corner — the terminal number. These details cannot be edited in the app.
- The shift card: Shift open (with the time it was opened) or Shift closed, with the button for opening/closing the day.
- The navigation rows: QR settings (with the current mode shown underneath — e.g. Static QR · Fixed amount; for a dynamic QR — the type only), Language (with the current language), Change password, Support. The user guide opens from the Support screen (below).
- Log out — signs the seller out (see below).
9.1 QR code settings
Profile → QR settings determines how the terminal works on the QR channel. The changes affect payment acceptance — change them only if you know which mode you need (as a rule, the administrator decides this).
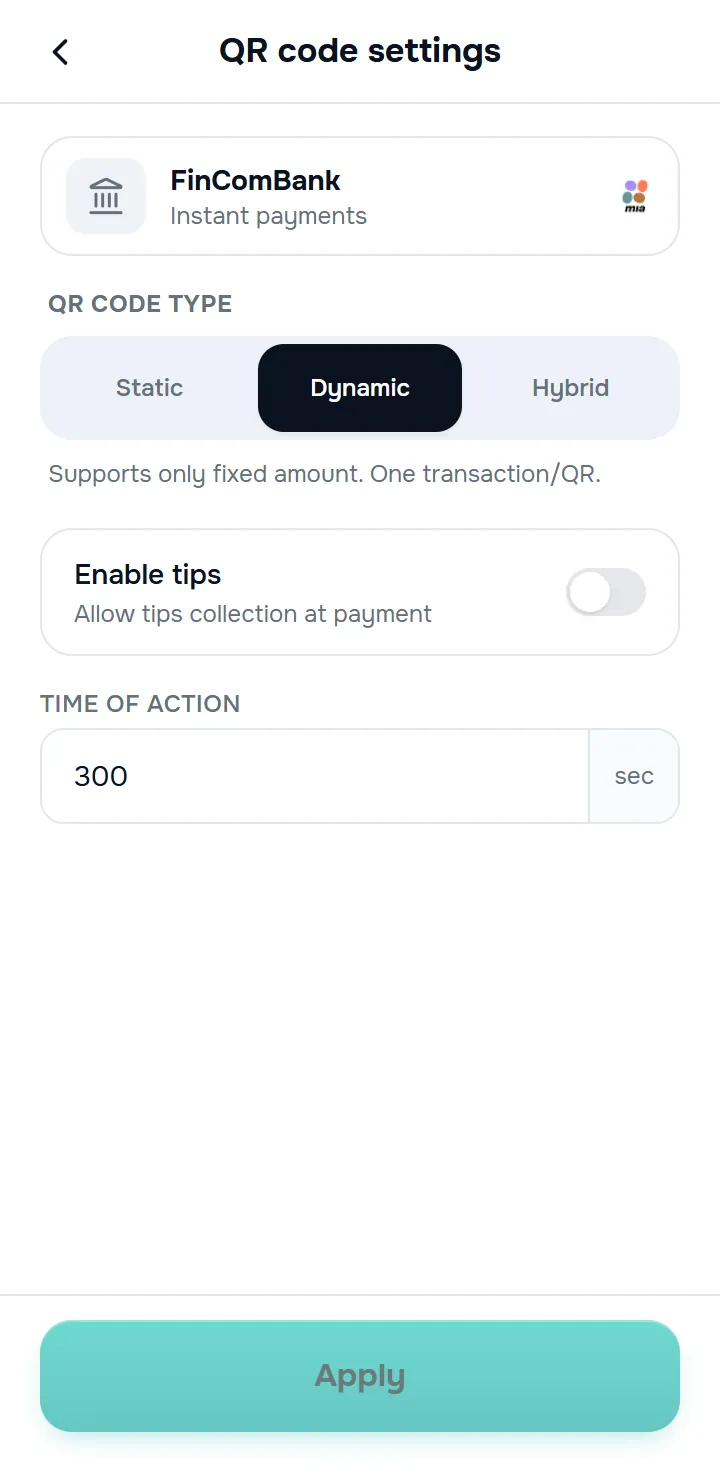
- QR code type — Static, Dynamic or Hybrid; a short description of the selected type appears under the selection (each type’s characteristics — in Chapter 3).
- Amount type (for static and hybrid): Fixed amount, Controlled amount or, static only, Not specified amount.
- Enable tips — dynamic QR only: lets the customer add a tip to the payment (Chapter 3). If the tips IBAN is not configured for the terminal, the app shows an error when you enable it — contact the administrator.
- Time of action — the lifetime of the generated QR code, in seconds; the default is 300 (5 minutes), the minimum value is 30.
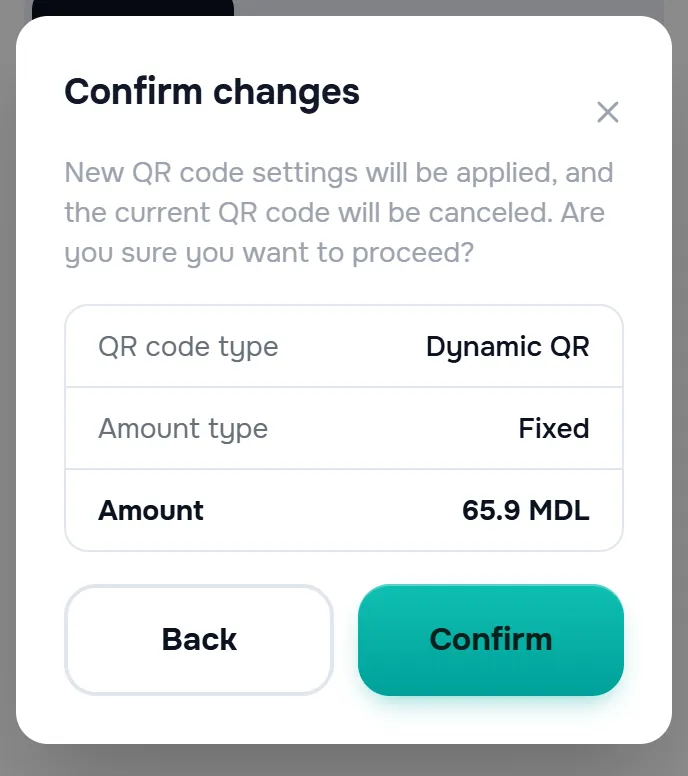
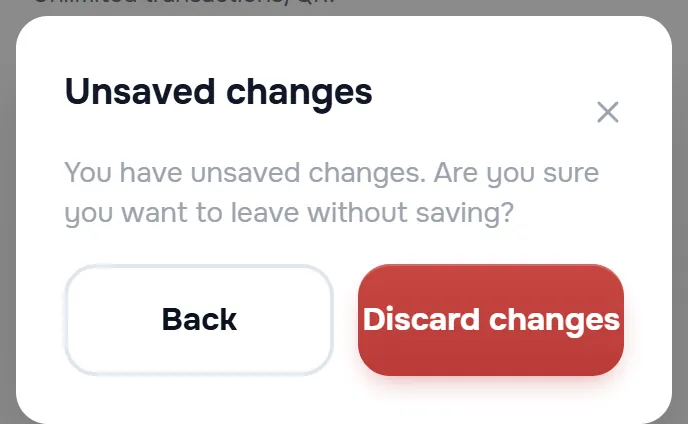
The Apply button becomes active only after a change. When you tap it, the app asks for confirmation: New QR code settings will be applied, and the current QR code will be canceled. Are you sure you want to proceed? If the terminal has an active QR code with an amount set, the window also shows the details of the code about to be cancelled (its type, amount type and amount). On a successful save, a green notification appears. If you leave the screen with unapplied changes, the app warns you (Unsaved changes).
If the administrator has forbidden changing the settings from the administration panel, the Apply button is not shown and the options are inactive; in place of the button, this text appears: To change the terminal operation mode, please contact the administrator.
9.2 Changing the language
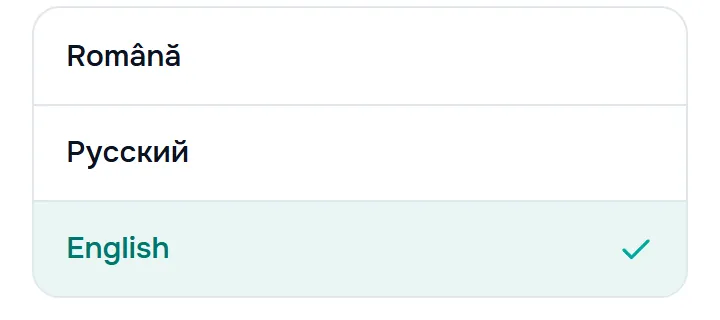
Profile → Language opens the Language settings screen: Română, Русский, English. The language applies immediately, with no saving — tap the language you want and go back with the back arrow.
9.3 Changing the password
Profile → Change password opens the password change screen for the signed-in seller.
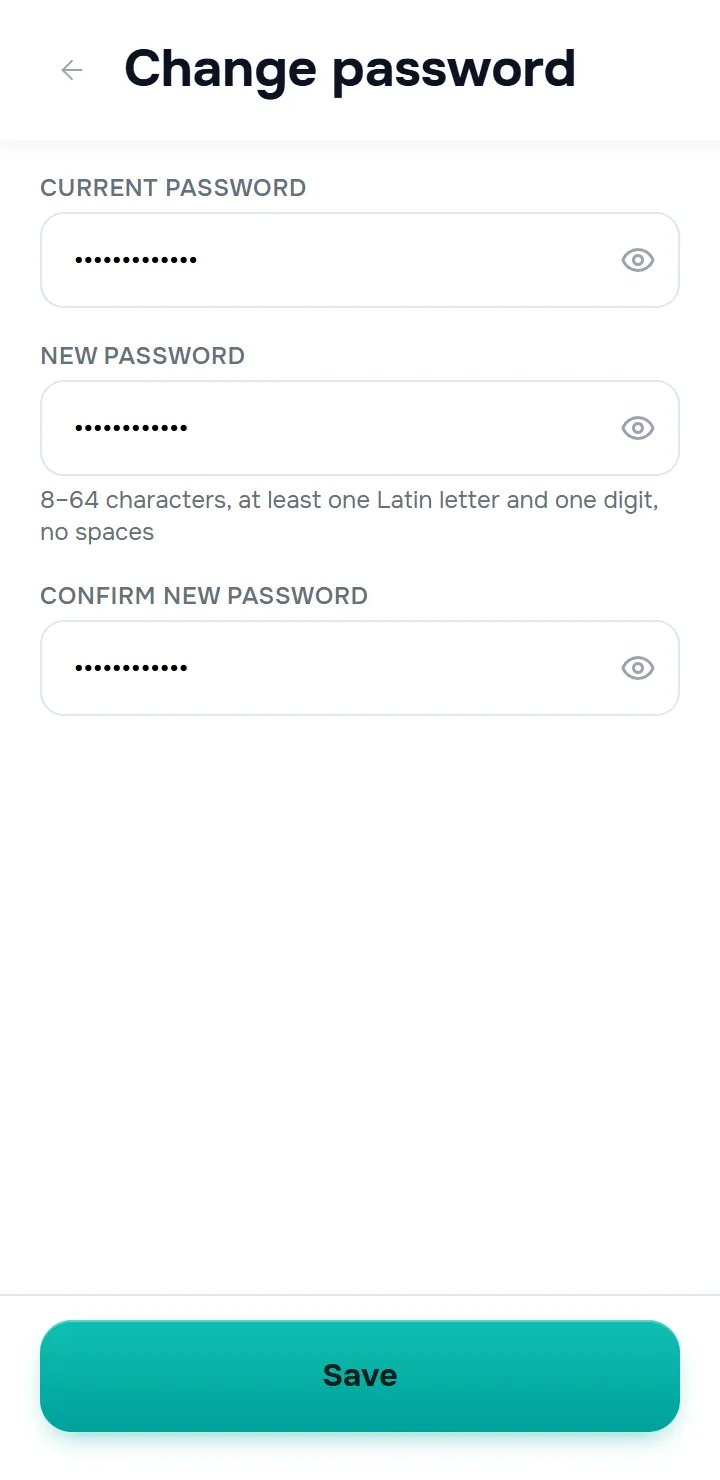
- Fill in the Current password, then the New password and Confirm new password. Each field has a show-password button.
- The requirements for the new password are shown under the field: 8–64 characters, at least one Latin letter and one digit, no spaces.
- Possible error messages: Passwords do not match, Wrong current password, New password must differ from the current one. After too many failed attempts, the change is temporarily blocked — try again after the indicated interval.
- On success, the Password changed notification appears — use the new password from the next sign-in on.
If you have forgotten the current password, it cannot be changed from the app — contact the bank. On terminals with automatic login (“always ready”), the Change password row is not shown.
9.4 Contacting support
Profile → Support opens the screen with the support contacts:
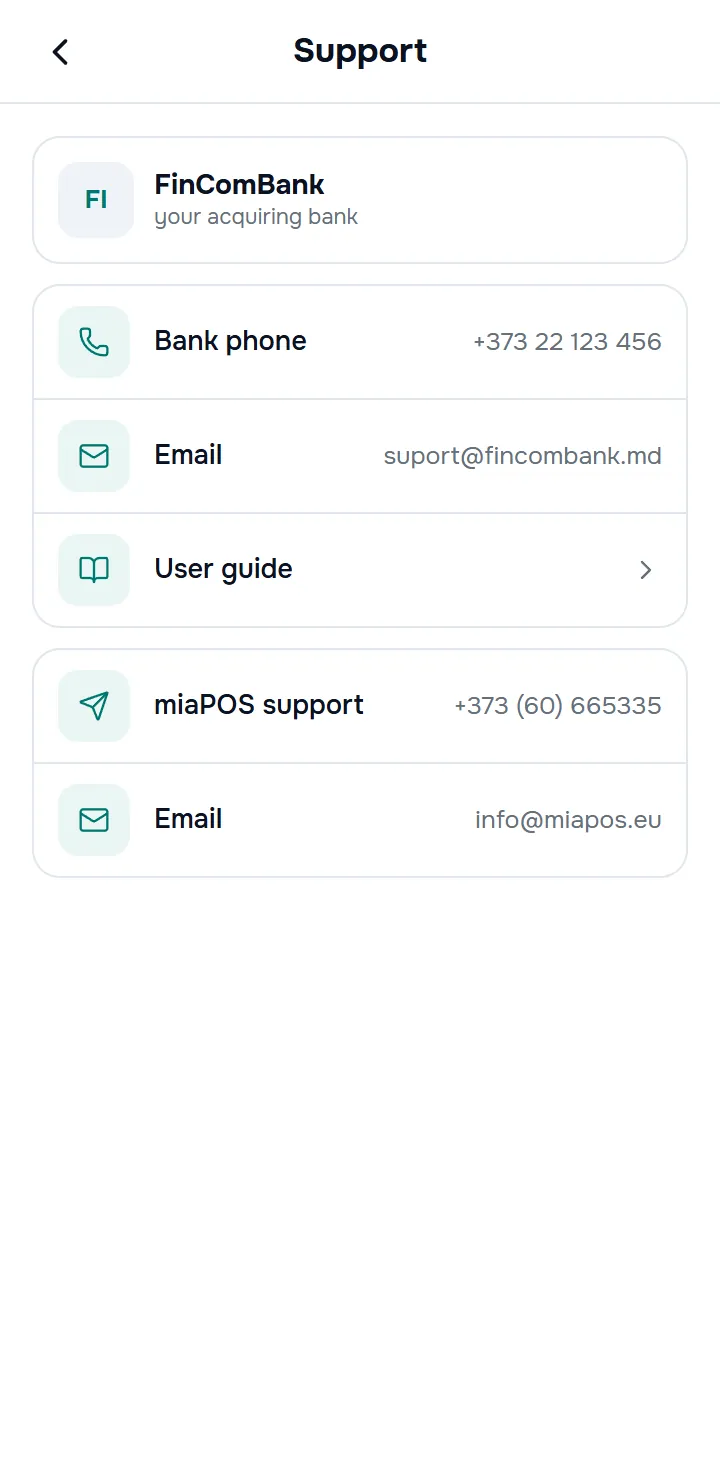
- Your acquiring bank — the first point of contact for issues with payments, your account or terminal activation: Bank phone (one tap starts the call) and Email (opens the email app).
- miaPOS support — the platform’s technical support, available around the clock: phone and email.
The Support screen also holds the User guide row, which opens this guide right on the terminal.
The same contacts are shown on the activation screen too (the Need help? block), so you can reach them even before signing in. When you call support, have ready: the terminal number (the id in the corner of the screen), the name of the point of sale and, for issues with a payment, the Transaction ID from Transaction details. Who resolves what — see Chapter 10.
9.5 Closing the day — the Z report
Closing is done from Profile → Close shift (Z). The Close the shift? screen opens with the day’s totals:
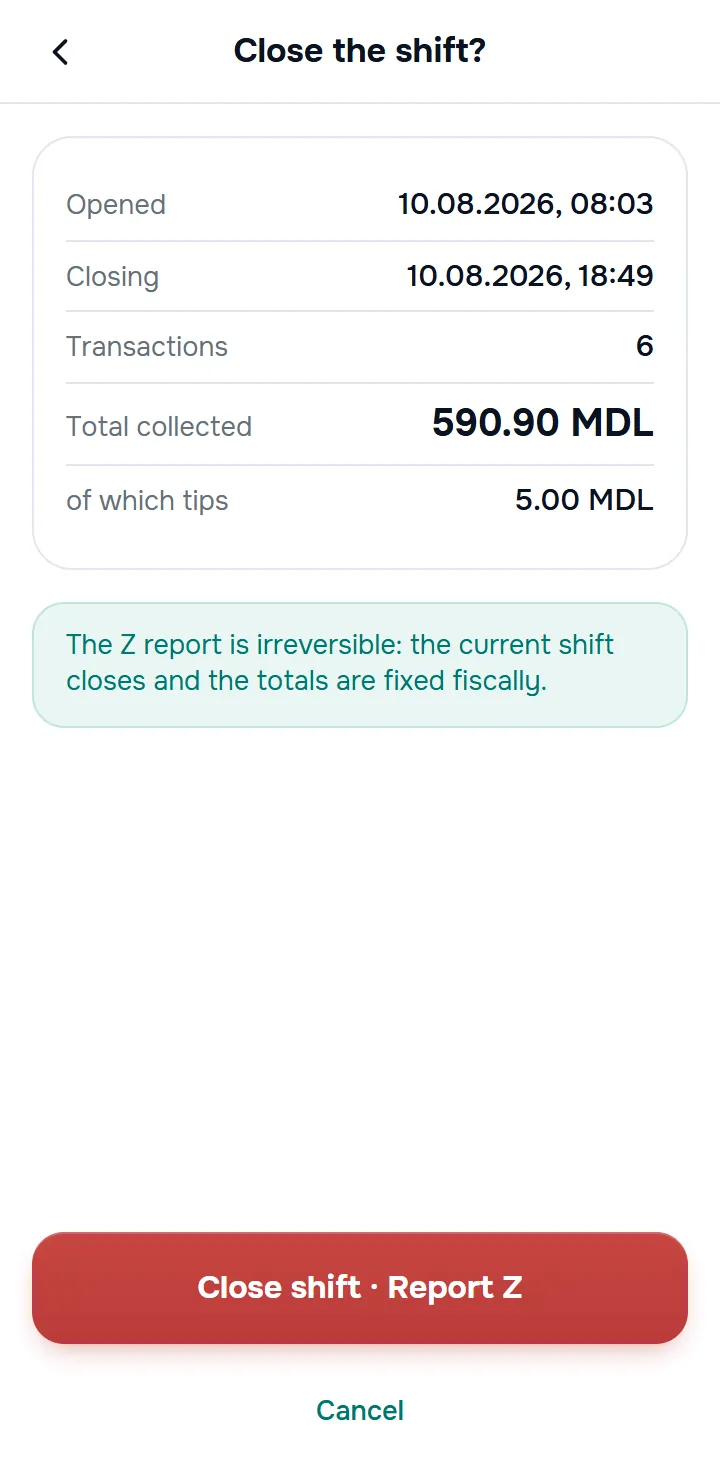
- Opened / Closing — the time the day was opened and the current time;
- Transactions — the number of operations in the day;
- Total collected — the amount taken in, with the of which tips row when applicable.
Check the totals against the cash register before confirming. The Z report is irreversible: the current shift closes and the totals are fixed fiscally. Tap Close shift · Report Z to confirm or Cancel to go back. After closing, the app shows The day is successfully closed. and automatically opens the Z report for printing or saving (Chapter 8).
9.6 Logging out
Tap Log out and confirm (Are you sure you want to log out?). If the working day is open, logging out first closes the shift — Z report included. After logging out, you return to the sign-in screen.
Important: on the Z report shown when logging out, printing and saving are not available (the app shows You are logged out. To print reports, please log in.). If you need the Z report printed or saved, close the shift from Close shift (Z) (above) before logging out, not the other way around.
On terminals with automatic login (“always ready” mode), the logout button is not shown.
10. Common issues and support
This chapter gathers the situations that come up most often at the checkout, each with a short solution, and the rules for contacting support.
10.1 What to do when something goes wrong
| Situation | What you do |
|---|---|
| The customer says they paid, the screen shows nothing | Wait a few seconds — the confirmation arrives with a small delay. Then check the transaction list (Chapter 7). |
| The QR code has expired | Generate a new one. No money was taken from the customer. |
| You already have an active QR | A previously generated code is still active — reopen it from the link on the keypad or with the green-dot button in the header; it closes on its own once it’s paid or expires. |
| You cannot type the amount | The working day is closed — open it (Chapter 2). |
| Tips cannot be enabled | The tips IBAN is not configured for the terminal — contact the bank. |
| The PF / PJ switch does not respond | It works only for the dynamic QR (Chapter 6). |
| Wrong amount, QR code not yet paid | For a dynamic code: open the code (the green-dot button in the header), tap Cancel and confirm, then generate a new one with the correct amount (Chapter 3). For static and hybrid codes with an amount: Edit amount, without generating another code. |
| Wrong amount, the payment came through | Refund (Chapter 7). |
| A link or RTP request sent by mistake | They cannot be cancelled — let them expire and send new ones (Chapter 5). |
| A row in Requests does not open | This is the app’s current behaviour — the request status is visible in the list, and a confirmed payment appears in the transaction list. |
| The app asks you to sign in again | The session has expired — sign in again; work continues where it left off. |
| The Terminal deactivated message | The terminal was deactivated by the bank — contact the bank. |
| You forgot your password | Contact the bank — the password cannot be reset from the app (changing the password from Profile requires the current password). |
| The printer does not print | Read the message shown — it names the cause: no paper, cover open, Bluetooth turned off, etc. (Chapter 8). |
| The app behaves strangely (blank screen, stale data) | Log out and sign in again; if that does not help, call miaPOS support. |
| The amount appeared on screen by itself, or the app closed itself after payment | This point of sale has its till integrated with miaPOS (Chapter 8) — normal behaviour, not an error. |
10.2 Who to call
The contacts are in Profile → Support (Chapter 9).
| Problem | Who to contact |
|---|---|
| Password, blocked or deactivated terminal, money, account details, fees, terminal activation | Your acquiring bank — the phone number and email at the top of the Support screen. |
| The app behaves strangely, a screen does not open, an error you have not seen before | miaPOS support — the phone number and email in the miaPOS support block, available around the clock. |
When you call, have ready: the terminal number (the id in the corner of the screen) and, for issues with a payment, the transaction number (from Transaction details).
10.3 Short rules to remember
- No open working day, no payments.
- You type in the amount; the customer confirms the payment in their bank’s app — you confirm nothing on the terminal.
- The tip is chosen by the customer — do not tap on their behalf.
- A QR code can be cancelled only before payment. After payment — refund.
- The link and the RTP request do not keep you on the screen — their status lives in Requests.
- Refunds and the Z report are irreversible.
- At the end of the day — Close shift (Z) and check the totals against the cash register.
11. Statuses and glossary
A reference chapter: all the statuses the app displays and the terms used in this guide, with their Romanian and Russian equivalents.
11.1 Transaction statuses
| Status | What it means |
|---|---|
| Paid | The payment has been received. It can be refunded in full or in part. |
| Partial Refunded | Part of the amount has been returned to the customer. The rest can still be refunded. |
| Full Refunded | The whole amount has been returned. No further action is possible. |
11.2 Request statuses (Link / RTP)
| Status | What it means |
|---|---|
| Pending | The request is active — waiting for the customer’s payment. |
| Expired | Time ran out and no payment arrived — applies to RTP requests (a payment link has no expiry). Create a new request if it is still needed. |
| Declined | The customer or bank declined the request, or a technical failure occurred during processing — the app shows the same label for both. If it keeps happening, contact support. |
11.3 QR code statuses
| Status | What it means |
|---|---|
| Active | The code can be paid. |
| Paid | The code has been consumed (a dynamic QR accepts a single payment). |
| Cancelled | The code was interrupted before payment — for example, automatically, when the tip changes on the QR screen. It isn’t a status the seller triggers directly from the current interface. |
| Expired | The Time of action from the settings has passed — generate a new code. |
11.4 Working day statuses
| Status | What it means |
|---|---|
| Day open | The terminal takes payments; the totals flow into the day’s Z report. |
| Day closed | Payments are blocked until a new day is opened. |
| Opened by another seller | The terminal already has a day opened by another user — it must be closed first. |
11.5 Glossary RO / RU / EN
| RO | RU | EN |
|---|---|---|
| Terminal de plată | Платёжный терминал | Payment terminal |
| Ziua de lucru (schimbul) | Рабочий день (смена) | Working day (shift) |
| Închide schimbul (Z) | Закрыть смену (Z) | Close shift (Z) |
| Raport X | Отчёт X | X report |
| Bacșiș | Чаевые | Tip |
| Suma cumpărăturii | Сумма покупки | Purchase amount |
| Cerere | Заявка | Request |
| Link de plată | Ссылка на оплату | Payment link |
| Cerere RTP | Запрос на оплату (RTP) | Request-to-Pay |
| Rambursare | Возврат | Refund |
| Bon de plată | Чек | Receipt |
| Plătitor | Плательщик | Payer |
| Persoană fizică (PF) | Физическое лицо | Individual |
| Persoană juridică (PJ) | Юридическое лицо | Legal entity |
| Timp de acțiune | Время действия | Lifetime |
| Banca acceptatoare | Банк-эквайер | Acquiring bank |
Appendix A. Counter card
One page to print and keep next to the terminal.
In short: three things a day
| When | What you do |
|---|---|
| Morning | Open the working day (the shift). |
| All day | Type in the amount → Generate QR → the customer scans → you see Payment received. |
| Evening | Profile → Close shift (Z) and check the totals. |
The rest of the guide explains what to do when something falls outside this routine.
10.2 Who to call
The contacts are in Profile → Support (Chapter 9).
| Problem | Who to contact |
|---|---|
| Password, blocked or deactivated terminal, money, account details, fees, terminal activation | Your acquiring bank — the phone number and email at the top of the Support screen. |
| The app behaves strangely, a screen does not open, an error you have not seen before | miaPOS support — the phone number and email in the miaPOS support block, available around the clock. |
When you call, have ready: the terminal number (the id in the corner of the screen) and, for issues with a payment, the transaction number (from Transaction details).
10.3 Short rules to remember
- No open working day, no payments.
- You type in the amount; the customer confirms the payment in their bank’s app — you confirm nothing on the terminal.
- The tip is chosen by the customer — do not tap on their behalf.
- A QR code can be cancelled only before payment. After payment — refund.
- The link and the RTP request do not keep you on the screen — their status lives in Requests.
- Refunds and the Z report are irreversible.
- At the end of the day — Close shift (Z) and check the totals against the cash register.